With the arrival of our baby girl coming soon my nesting instincts have kicked into high gear. Number one priority right now is prepping all of the decor for her nursery! One item I have made for our girls room that I knew we needed in the babies room as well is a bow and headband holder. These are SO EASY to make and customize to your nursery theme that I wanted to share a quick tutorial with you!
You will need the following supplies to throw together this DIY bow and headband holder:
*Blank Canvas: I prefer the 12×24 size
*Fabric (for covering the canvas)
*Cup Hooks: I picked mine up at Home Depot but you can find them online as well
*Felt
*Grosgrain Ribbon in 1″ or 1.5″ width
*Glue Gun, Scissors, Measuring Tape or Ruler, Lighter (for heat sealing ends of ribbon)

Your first step will be to lay the canvas on top of your fabric and cut the fabric to size. It will need to be several inches larger on all 4 sides so that you have enough fabric to wrap around the back edges. Be sure your fabric design is STRAIGHT before cutting!

Next, you will wrap the top and bottom edges of fabric taut over the back of the frame and glue in place using hot glue. If your fabric is cut too large and hangs over the wooden frame trim it down before gluing. Be sure to check that the fabric is straight and taut on the canvas after gluing these two sides into place.

You will then glue the next 2 sides onto the back frame. Mine were too long and hung over the frame so I trimmed them down before gluing. You will tuck the corners in and glue first, see photos below. Again, be sure your fabric is tight and straight on the front of the canvas. After gluing down all 4 sides you can add fray check around the edges if you would like, I did not on this one but have on the ones I have gifted. These raw edges will later be covered so it isn’t necessary to fray check.


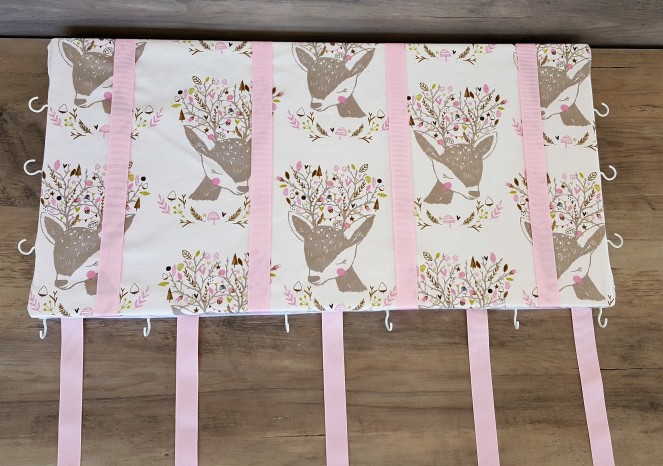
The next step is to add ribbon to the front of the frame to clip your bows onto. You will use your measuring tape to mark along the top and bottom back frame where you would like to attach the ribbons. I marked every 3 inches on mine and then chose to add only 4 ribbons instead of 6 as it covered too much of the fabric design on the front. My ribbons needed cut to 16 inches to fit this size canvas. You will then glue the ribbon down at each marking being sure to pull it taut before gluing the other end down.


After the ribbons have been added to the front of the frame I like to also add hanging ribbon to the bottom to clip additional bows onto. Being a bow maker my girls have LOADS of hair accessories and need as much storage on these holders as possible. Again, you will mark on the back of the frame using your tape measure where you would like to attach the ribbons. I spaced my hanging ribbon evenly between the ribbons on the front. I used 20 inches for my ribbon length, you will need to use your lighter to heat seal the bottom of the ribbon to prevent fraying.

Once all of your ribbon is added you will cover your back frame pieces with felt to cover the raw edges and give the back a nice finished look. **If you would like to add ribbon or twine to hang the frame from please add it BEFORE adding the felt. I chose to hang this one from the frame and not add a ribbon.** Measure the width of the wood on the back of your frame to cut your felt to size, 1.5″ width for my felt strips was perfect for this frame.

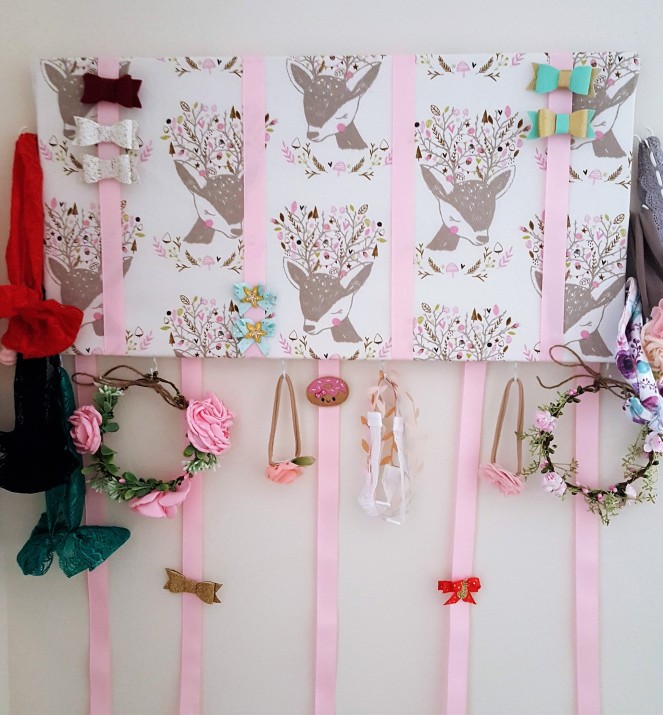
Your last step will be to add the cup hooks to hang your headbands onto! You will use your tape measure one more time to evenly space your hooks on both sides and the bottom of the frame. It is completely up to you how many hooks you would like! Since the canvas frame is wood these hooks screw right in so easily.

You are finished! Wasn’t that super easy and quick?! Now, go hang it up in your little girls room and organize all those adorable hair accessories!