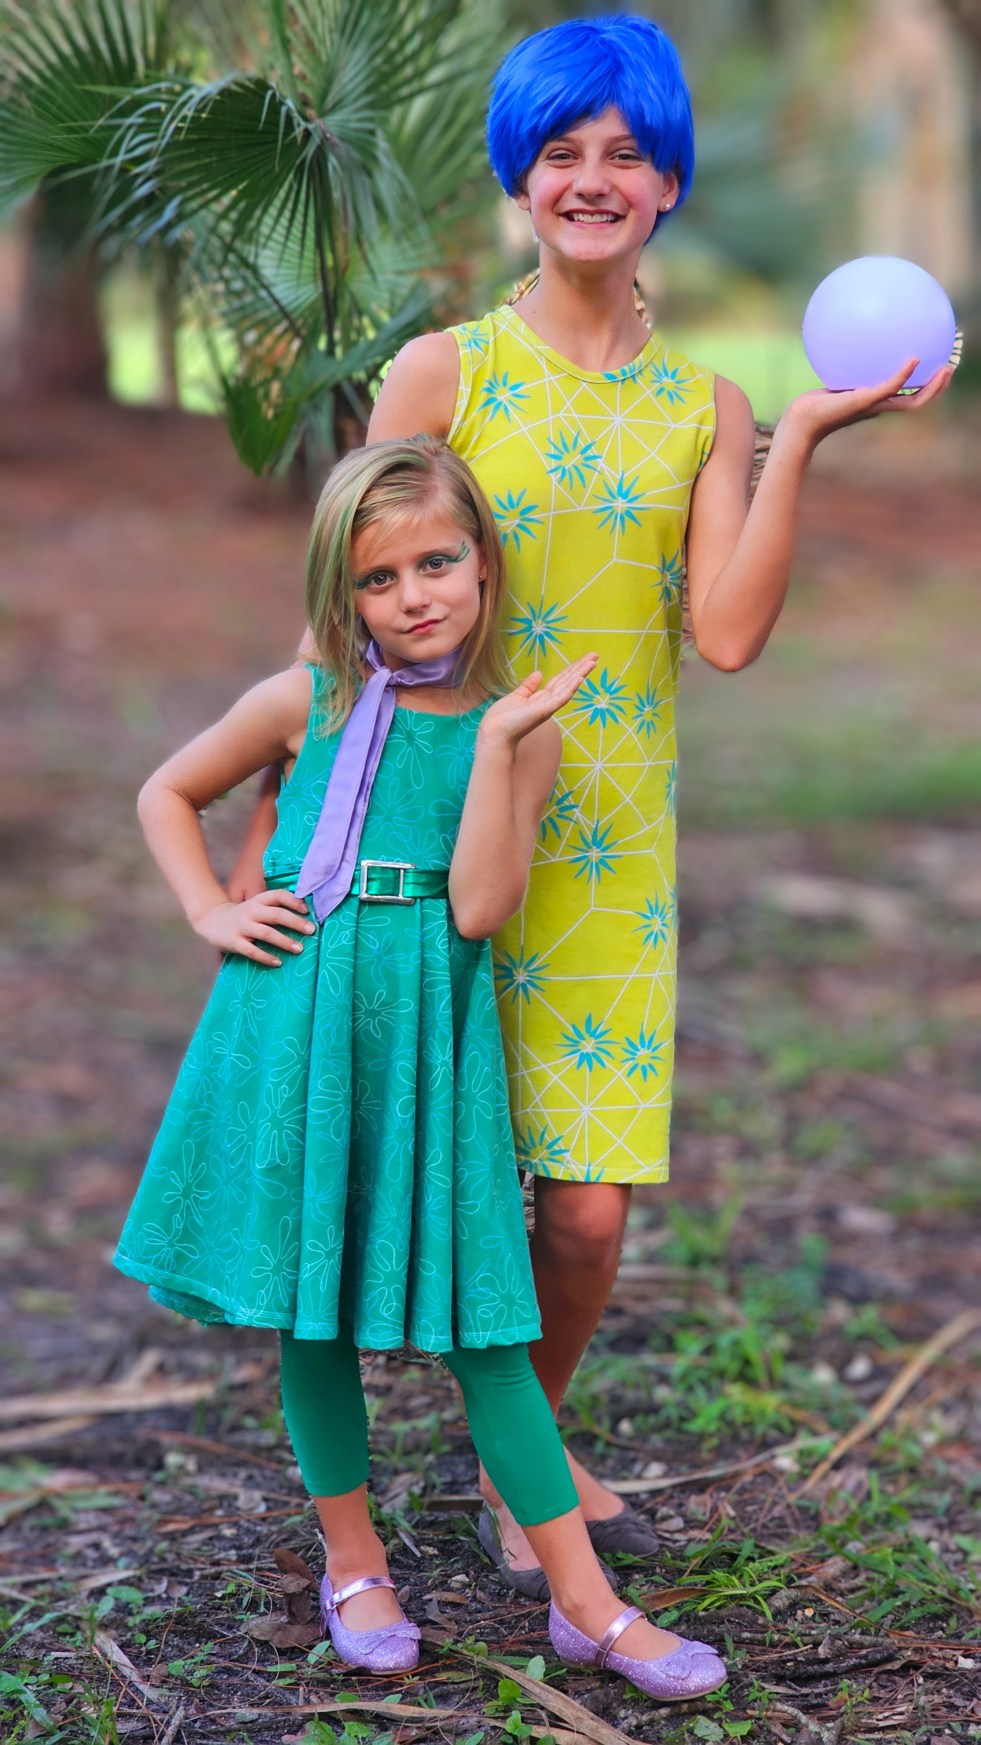
My family does themed Halloween costumes most years and my two youngest wanted to go with an Inside Out theme this year! They picked Joy and Disgust as the characters for their costumes and both fully embraced these personalities!
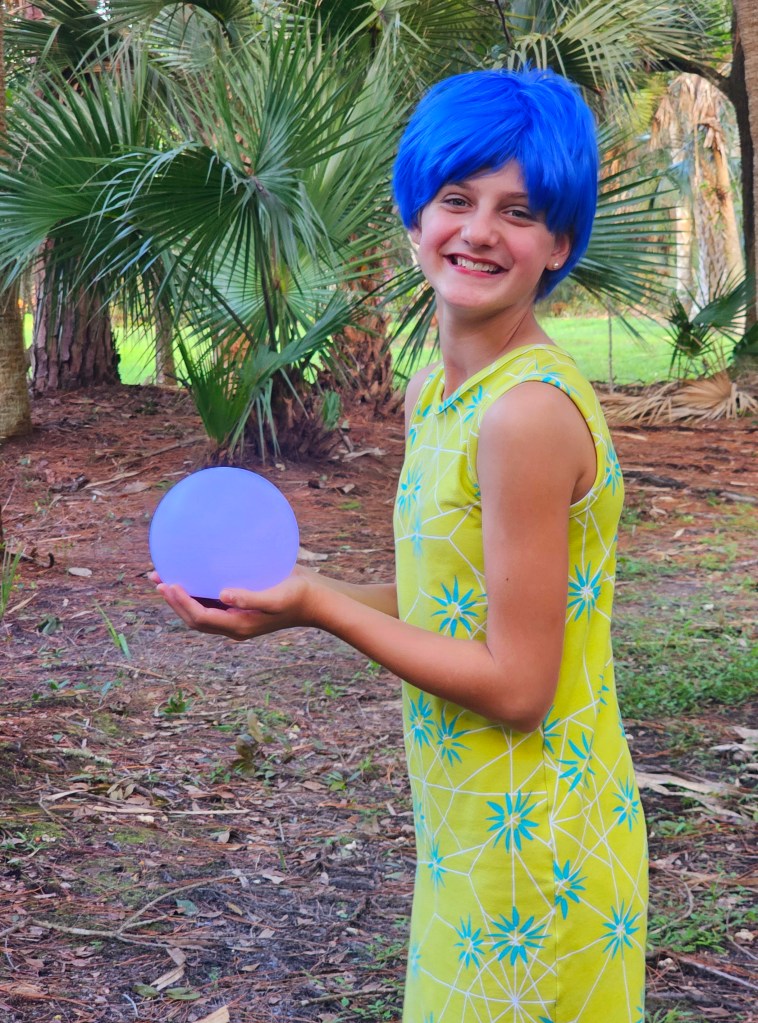
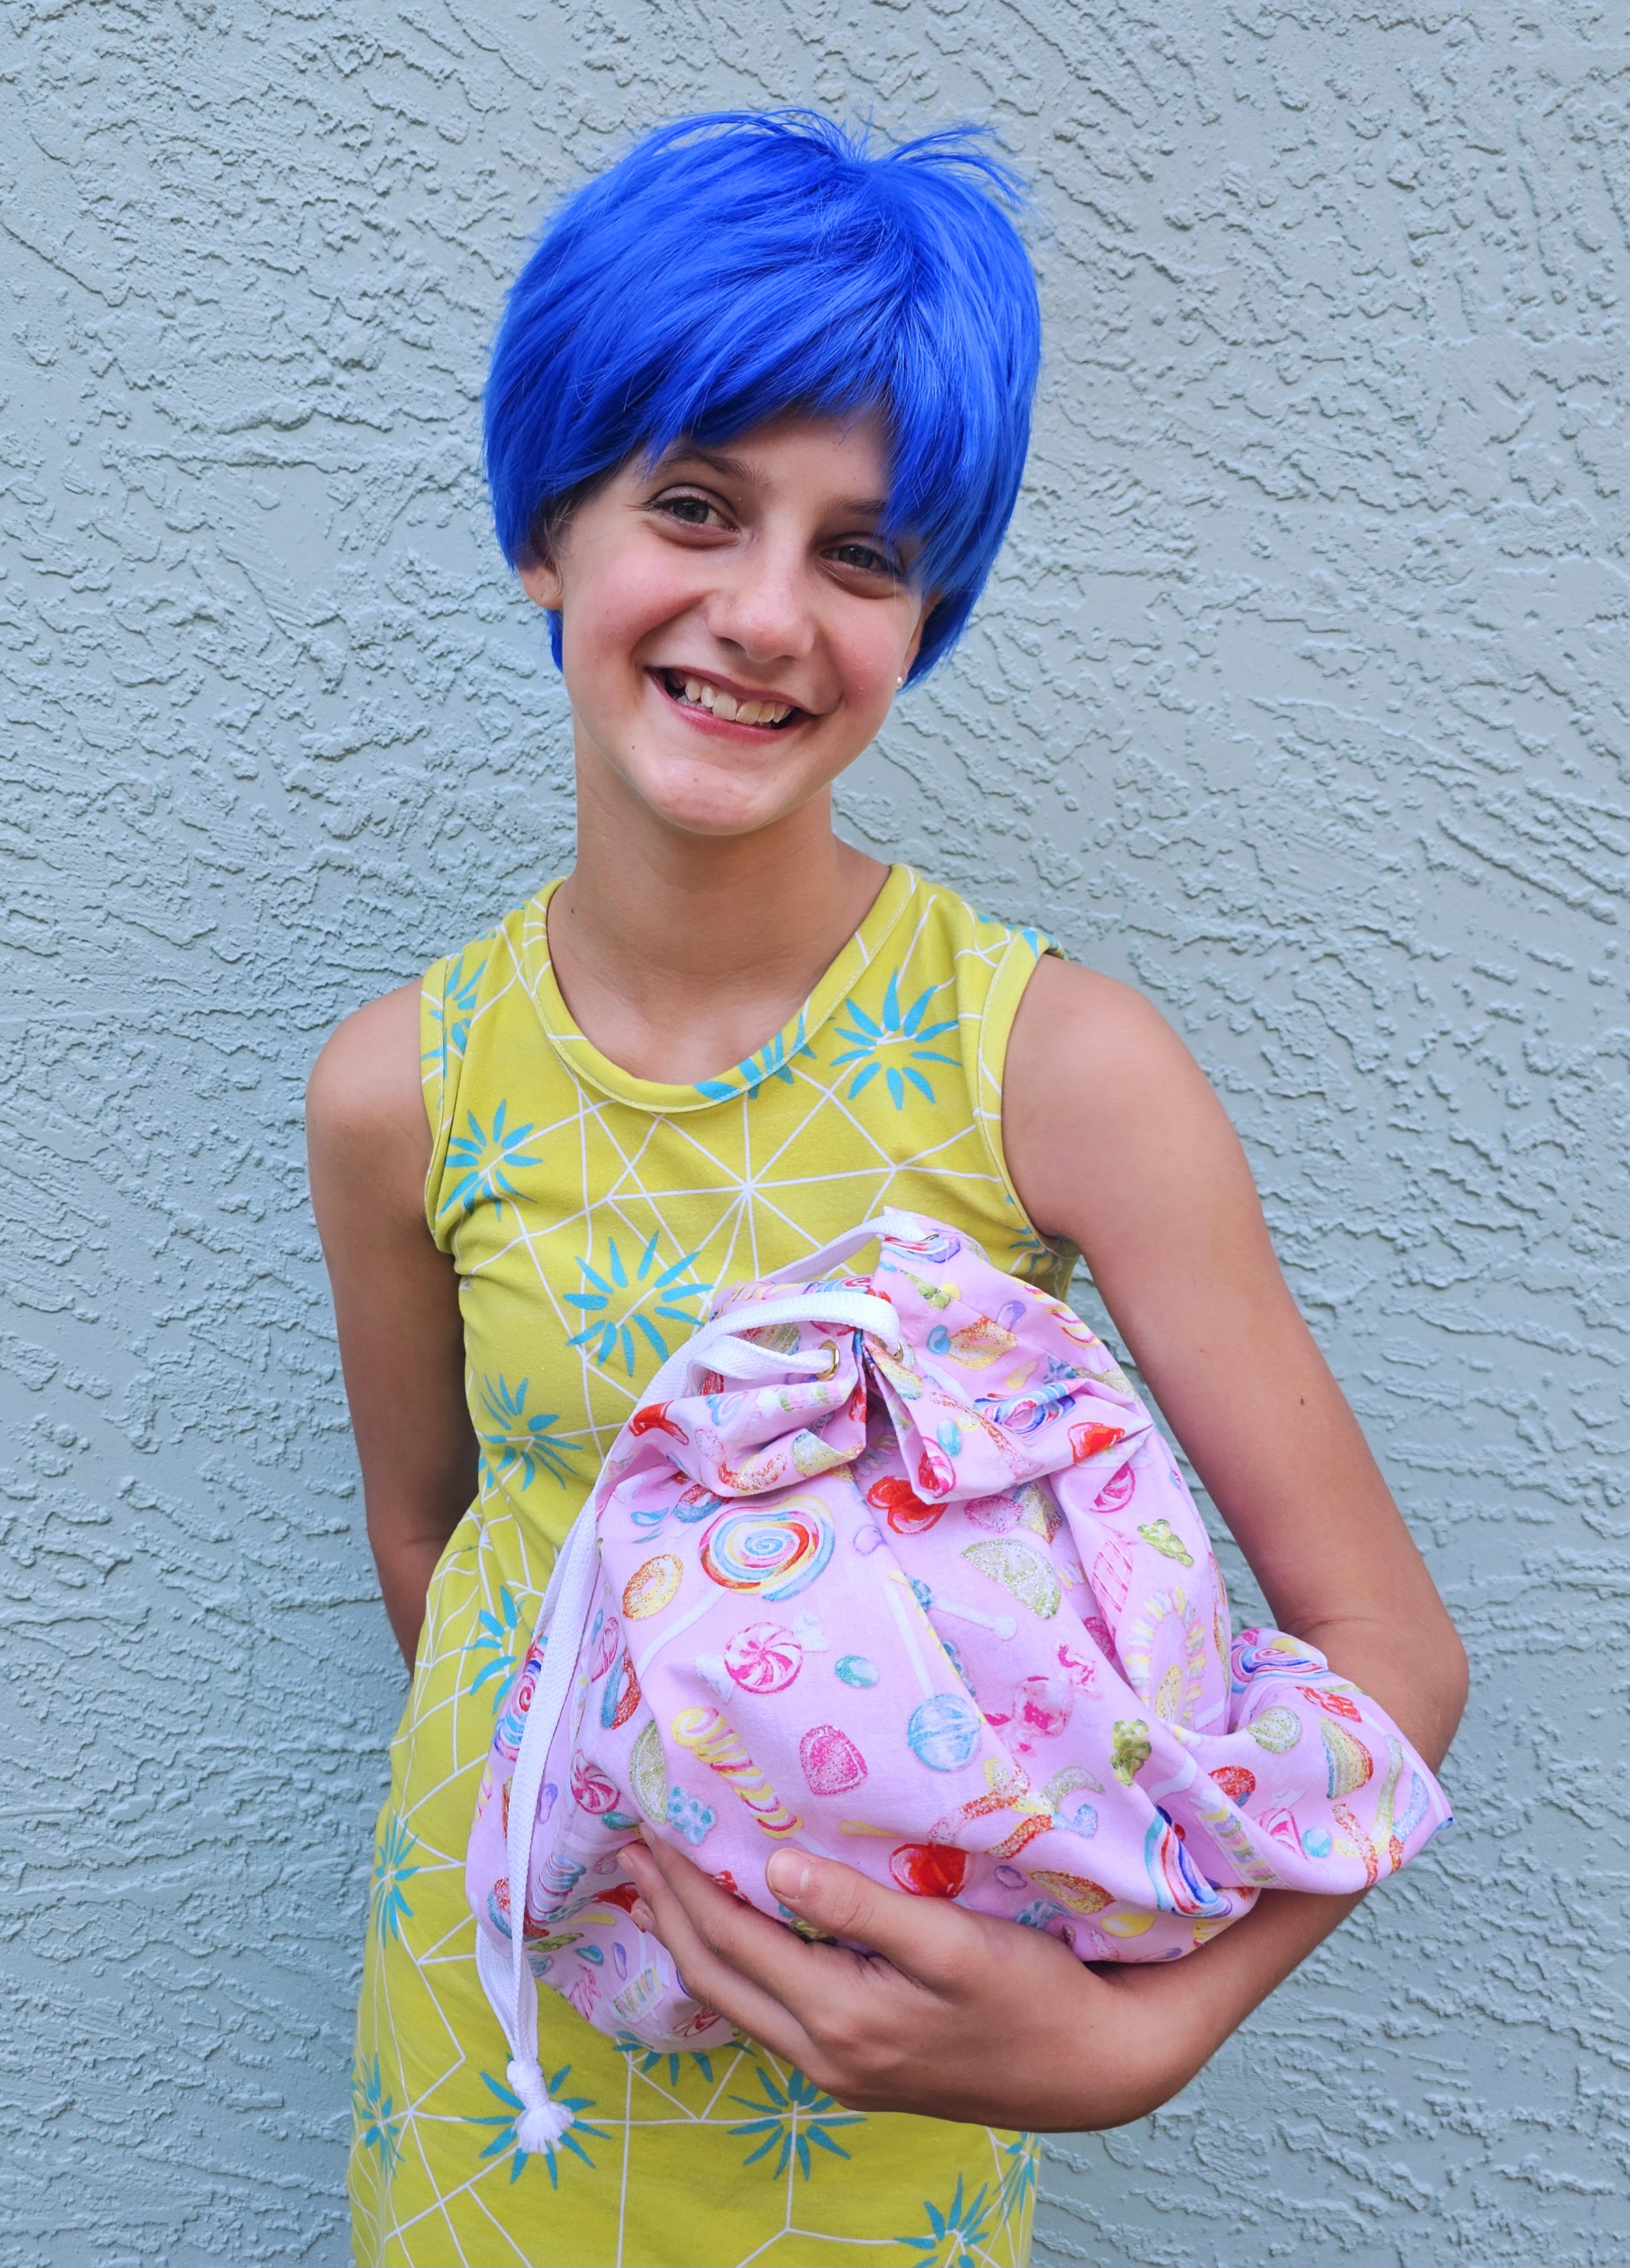
I used all Simple Life patterns for both costumes. I used the Quinn and Energize patterns for Disgust and Autumn for Joy. I used the simple version of Energize in the capri length and did the circle skirt (not high low version) of Quinn. I then added a quick belt using scraps of fabric, thick interfacing and a belt loop that I had on hand to match. For her neck scarf I upcycled the satin lining of a ripped up tutu in my girls’ dress up box. I also used the simple version of Autumn for Joy’s costume (which is by far the easiest costume I have ever sewn). To complete the look for Joy we bought an LED light (with remote) from 5 Below and a wig on Amazon. Both costume fabrics are from Purple Seamstress and were just perfect for re-creating these looks!
My daughter also asked me to re-create Bing Bong’s Bottomless bag to use as her trick or treating bag to match her costume. I loved her idea so much! I found similar candy themed fabric at Hobby Lobby and I wrote up a blog post for Simple Life with a free tutorial on a cinch bag using 2 different methods to complete her look. Now both girls have new trick or treat bags in the Inside Out theme. Head over here and check out the EASY and free tutorial to sew up your own cinch bag.
I just love sewing up our family costumes every Halloween and can’t wait to see what next year has in store! I hope you are inspired for your costumes and I would love to have you follow me on Instagram for my sewing adventures as well!
*This post does include some affiliate links but all opinions and views are my own*
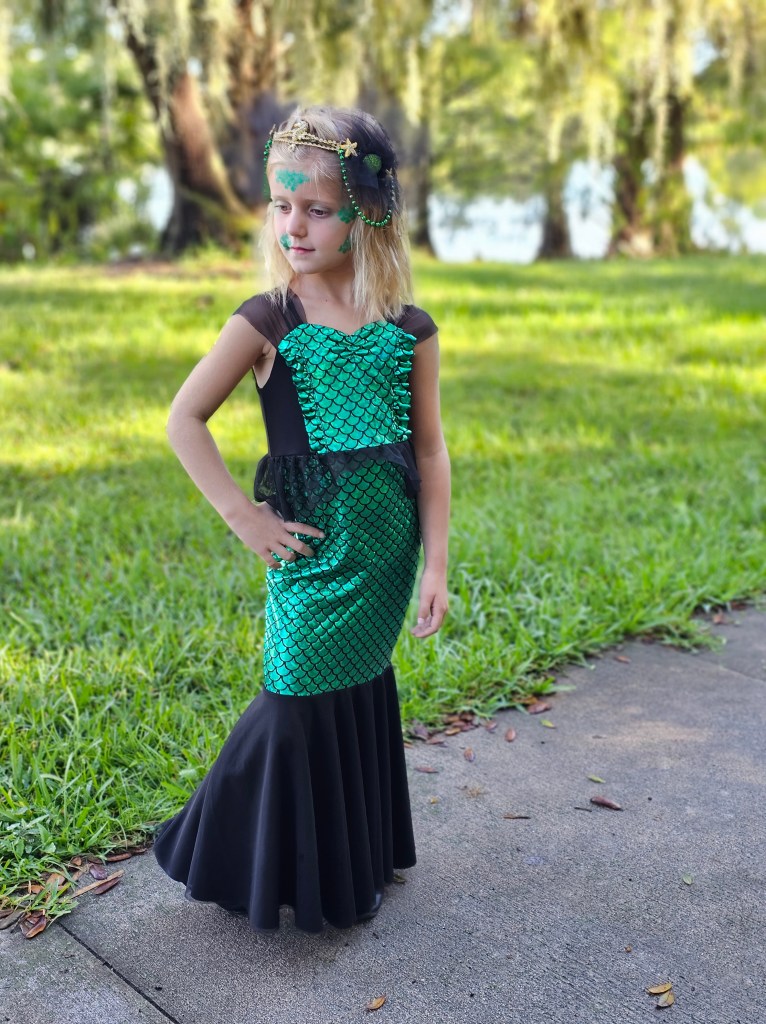
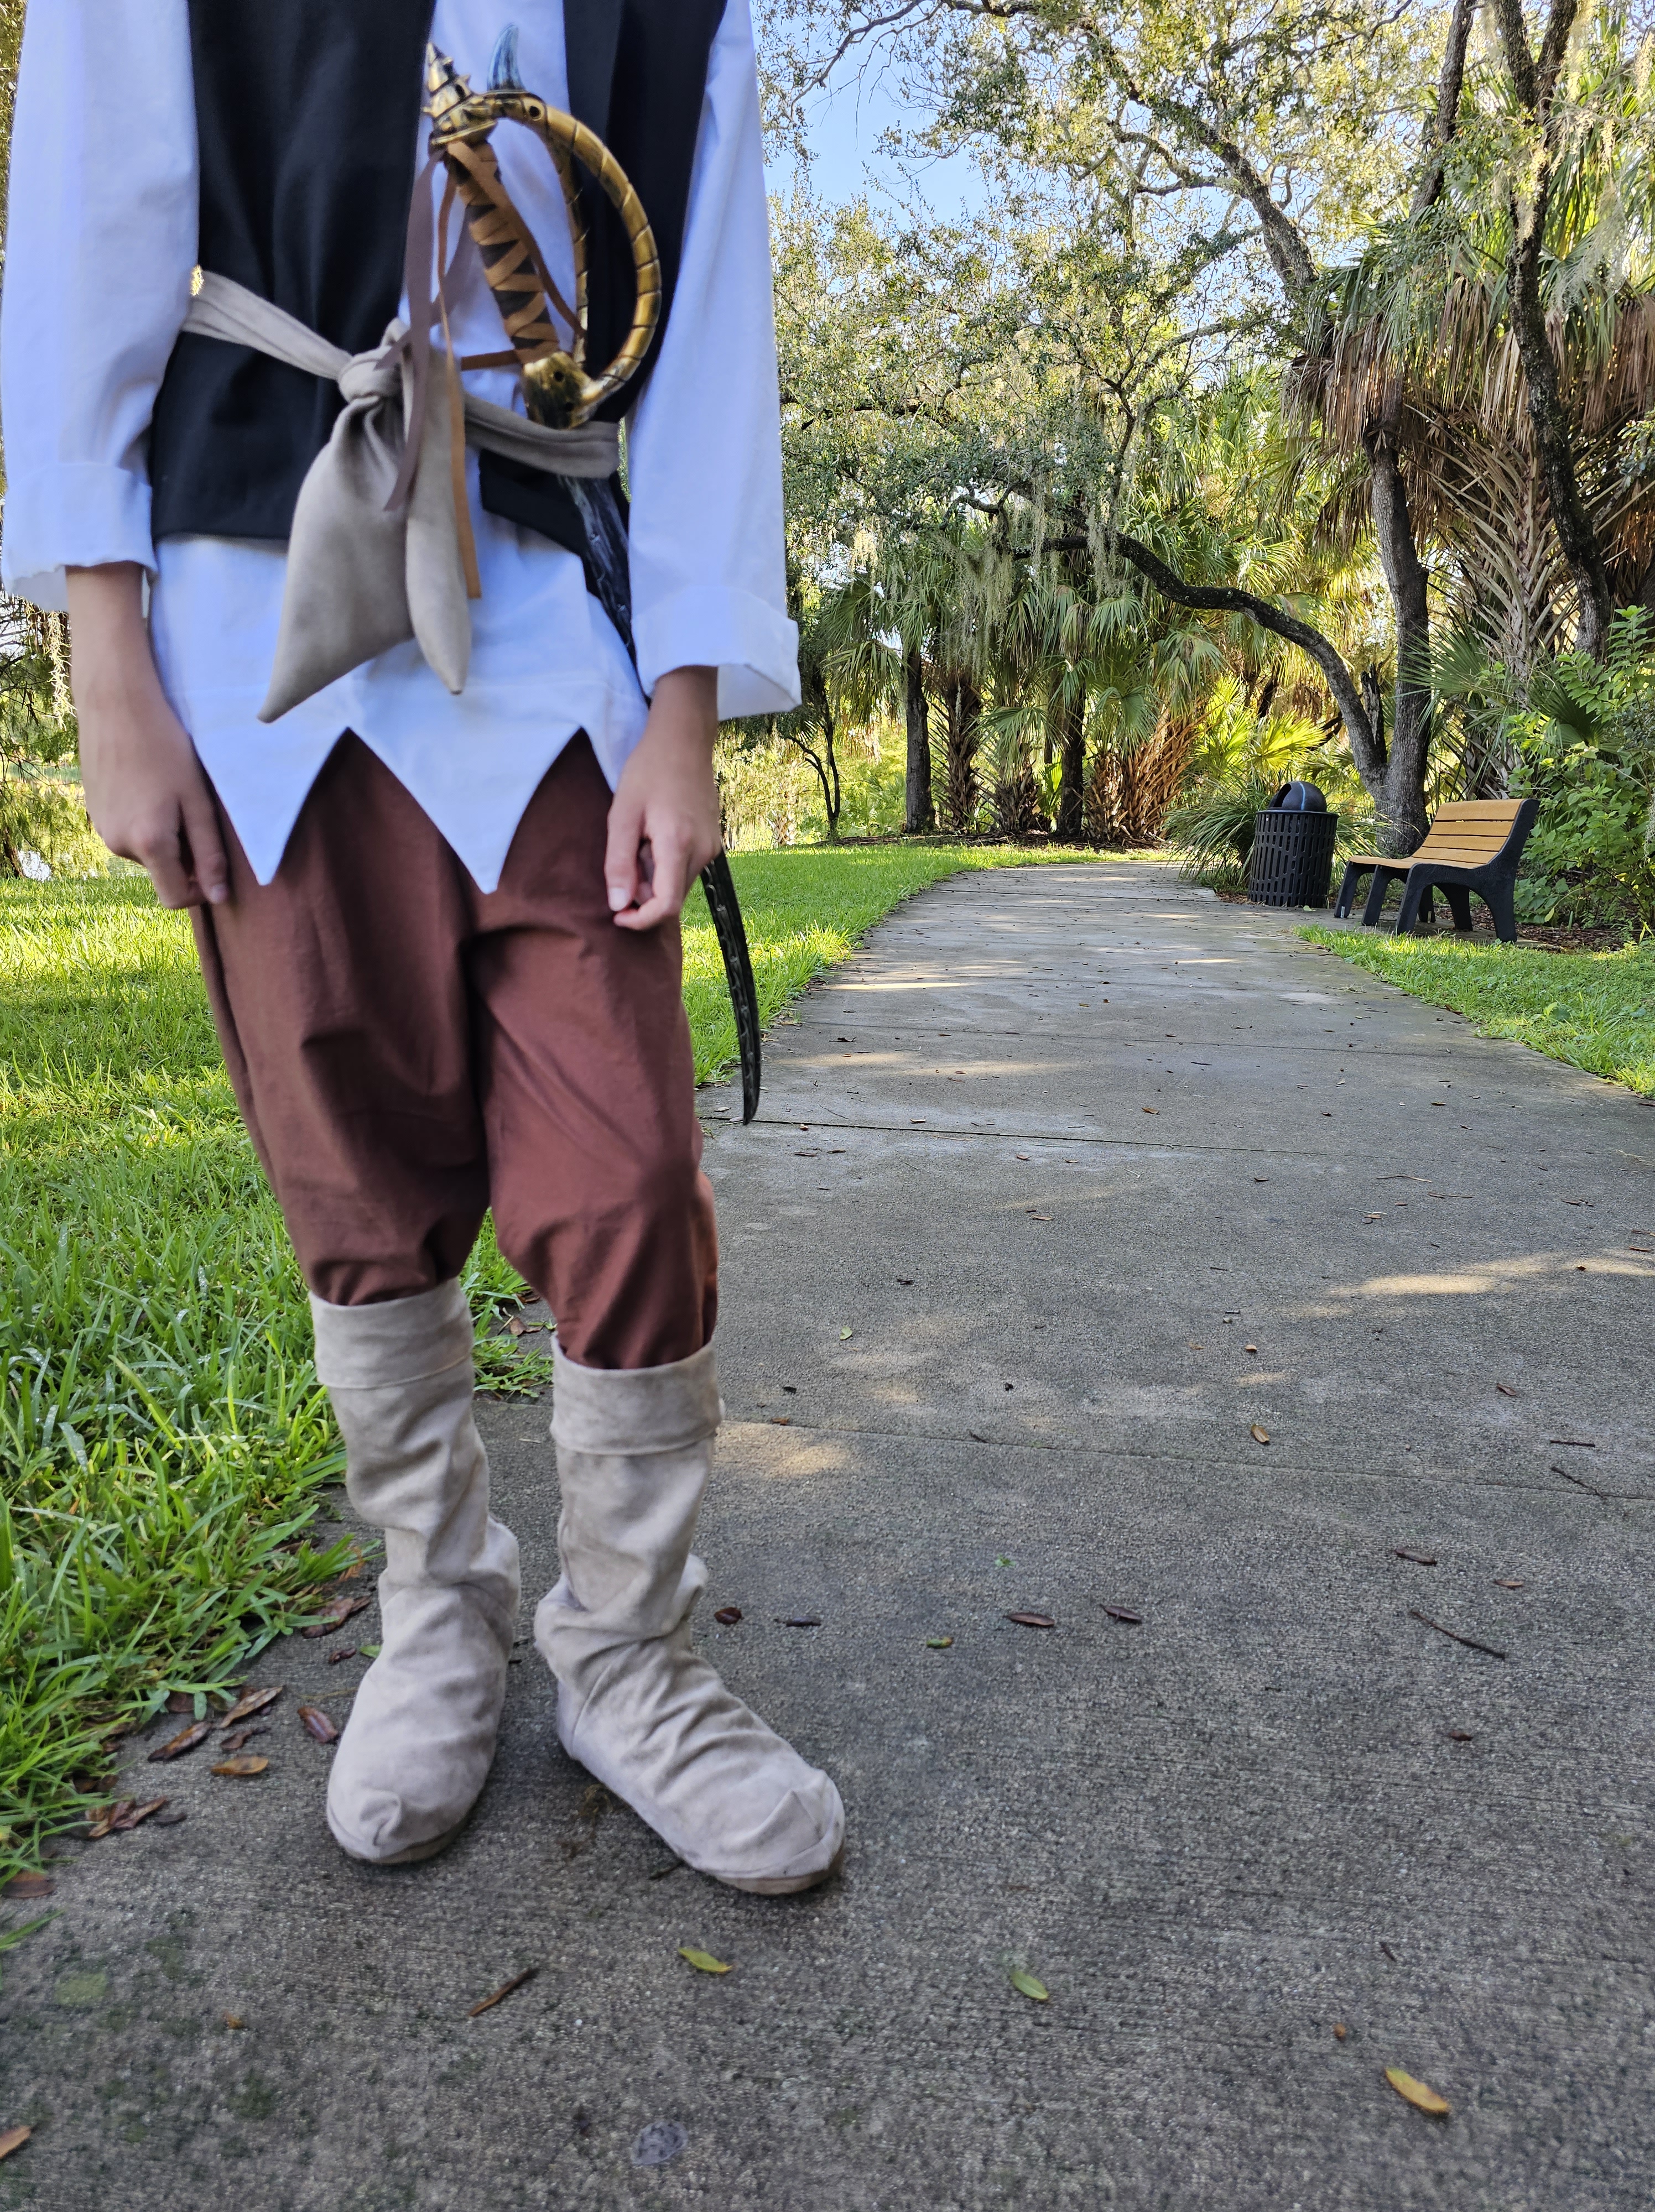
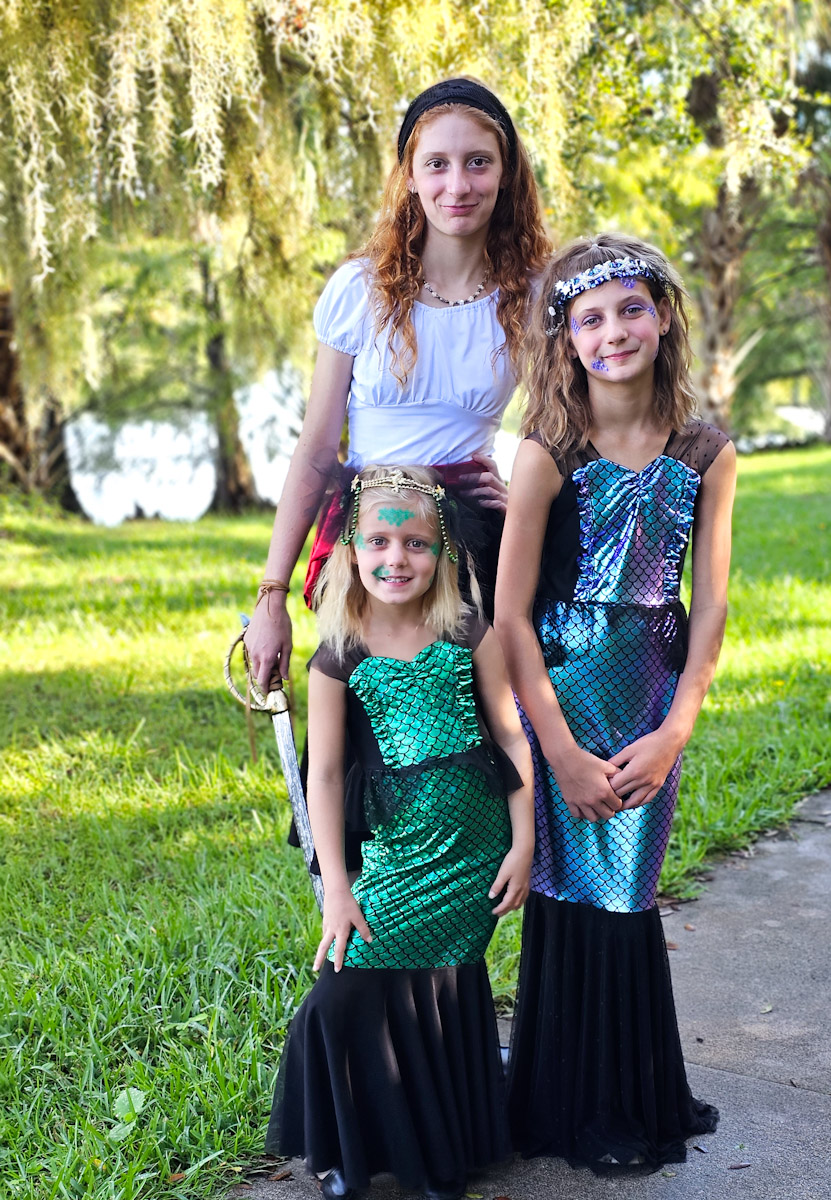
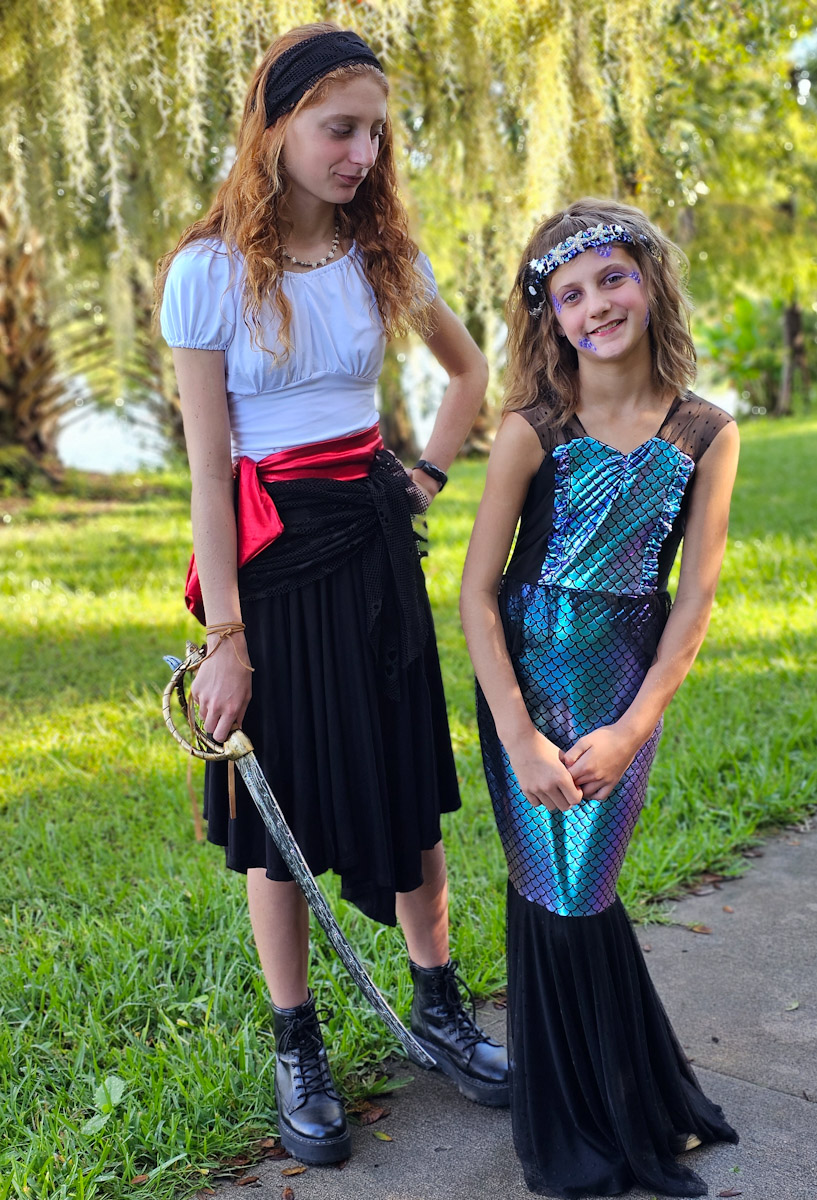
My family does themed Halloween costumes every year and our kids wanted to be pirates and mermaids this year! I am so excited to share these makes with you all! This was such a fun (and easy!) theme to bring to life with my kids.
First, I will share the mermaid costumes with you. My two youngest daughters LOVE anything mermaid and magical so this was such a perfect fit for both of them. I used the Sirena pattern from Boo & Lu patterns. This pattern is mermaid perfection, I did not alter this pattern in any way to achieve my daughter’s costumes! We created some over the top mermaid headpieces with face make-up to complete their look.
Next, my older two kids wanted to be pirates for Halloween. For my son’s costume I used the Master of Disguise and Imagine patterns from Sew A Little Seam. If you aren’t familiar with the Master of Disguise pattern it is just PACKED with endless costume options. I actually blogged all about this pattern here when it released several years ago. This time I chose the cropped length woven pants, open vest, peasant shirt with zig zag hem and boot covers for his look. I did not modify the pattern for any of these costume pieces. To complete his look he wanted an authentic looking pirate hat so I used the witch hat included in the Imagine pattern but modified it and then used fabric stiffener to get it to really hold the shape. For the hat modification I cut the pointy portion of the hat off and then sewed another circle on top the same circumference as the hat opening. I then sewed up a quick self-drafted belt and head sash to tie together his pirate look.
Finally, my for my daughter’s look I mashed the Raven and Dragonfly patterns from Boo & Lu. For her top I used the Dragonfly which comes with a top option and did not modify the pattern pieces. For her skirt I used the Raven pattern and cut at the natural waistline in the dress pattern piece to create a skirt instead of a dress and finished it by adding a waistband. To complete her look I added self-drafted sashes.
I just love sewing up our family costumes every Halloween and can’t wait to see what next year has in store! I hope you are inspired for your costumes and I would love to have you follow me on Instagram for my sewing adventures as well!
*This post does include some affiliate links but all opinions and views are my own*
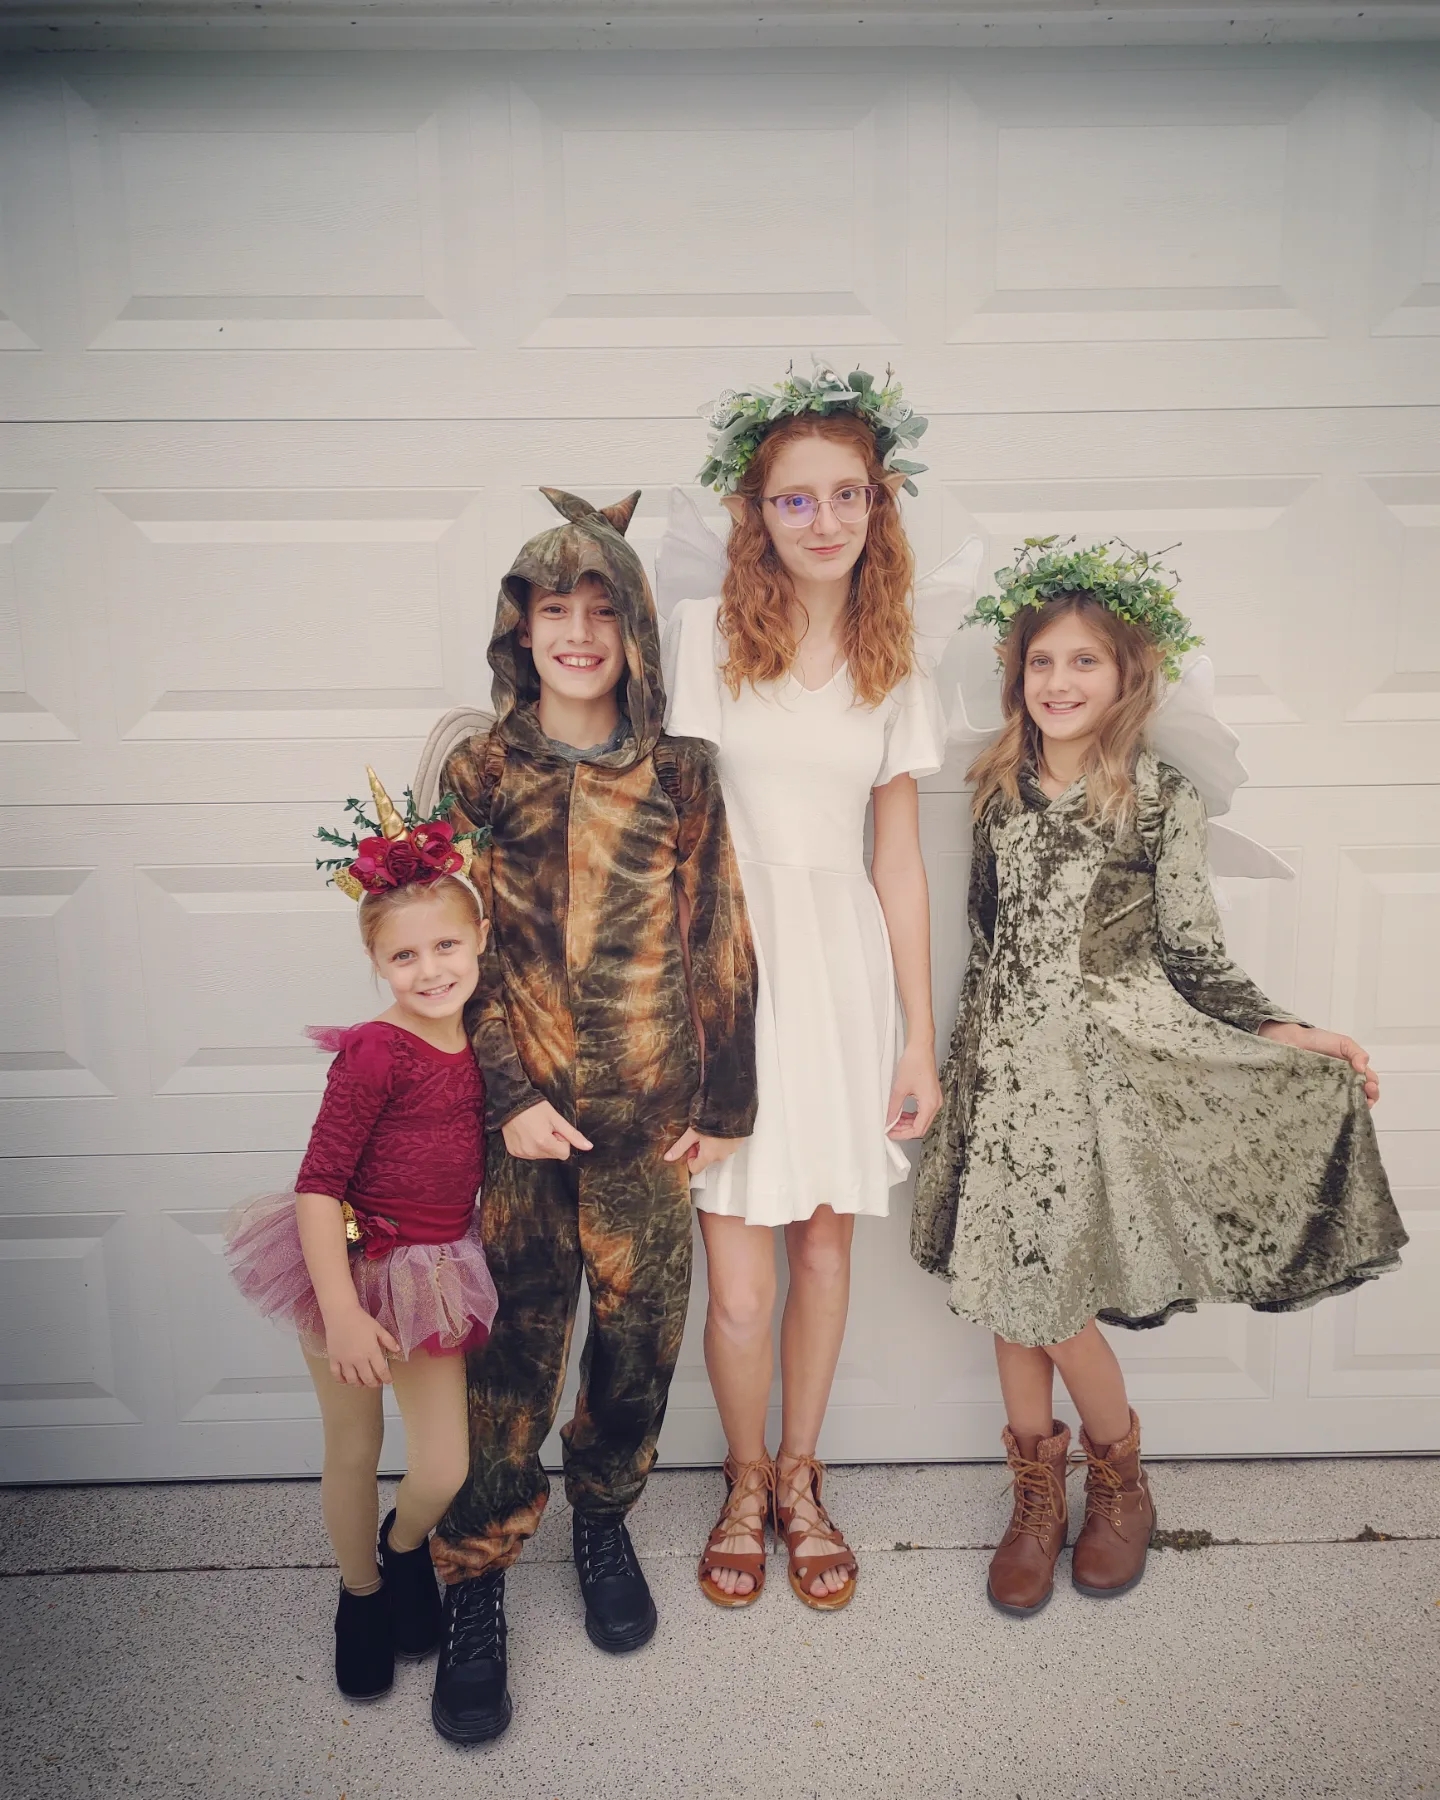
My family does themed Halloween costumes every year and our kids wanted to be mythical woodland creatures this year! I am so excited to share these makes with you all! I absolutely love the theme we picked and loved bringing each vision to life. We chose pixies, dragons and unicorns as the creatures they wanted to dress up as.
First, my youngest is four years old and currently obsessed with all things unicorns, magical, fancy and glittery. She decided to be our unicorn of the group. I knew that the Juliet leotard from Petite Stitchery would be the perfect base for her costume. I only modified this pattern to add decorative glitter elastic to the back neckline and tulle flutters to the shoulder seam. I found some amazing burgundy stretch lace on clearance and layered this over a burgundy ponte I had on hand (which happened to be a near perfect match) for her leotard. This pattern also includes a free tutu with it so I used the waistband that was included but modified the tulle for hers. I used to be a tutu and bow maker so I have LOADS of 6″ rolls of tulle still sitting around. I decided to use up some of my existing tulle supply for this costume. I gathered 3 layers of burgundy and a top layer of gold glitter (FYI glitter tulle sheds EVERYWHERE so be prepared to be a walking glitter bomb if you go this route) and then attached these 4 layers to the waistband. I fully enclosed the tulle inside of the waistband for a nice clean finish. This resulted in a really fluffy tutu and was exactly the look we were going for. I would have loved to make her matching gold glitter tights but was unable to find a suitable fabric for this task so ended up ordering her tights on Amazon instead. I handmade her unicorn horn headpiece as well and that was probably the most fun part of making her costume!
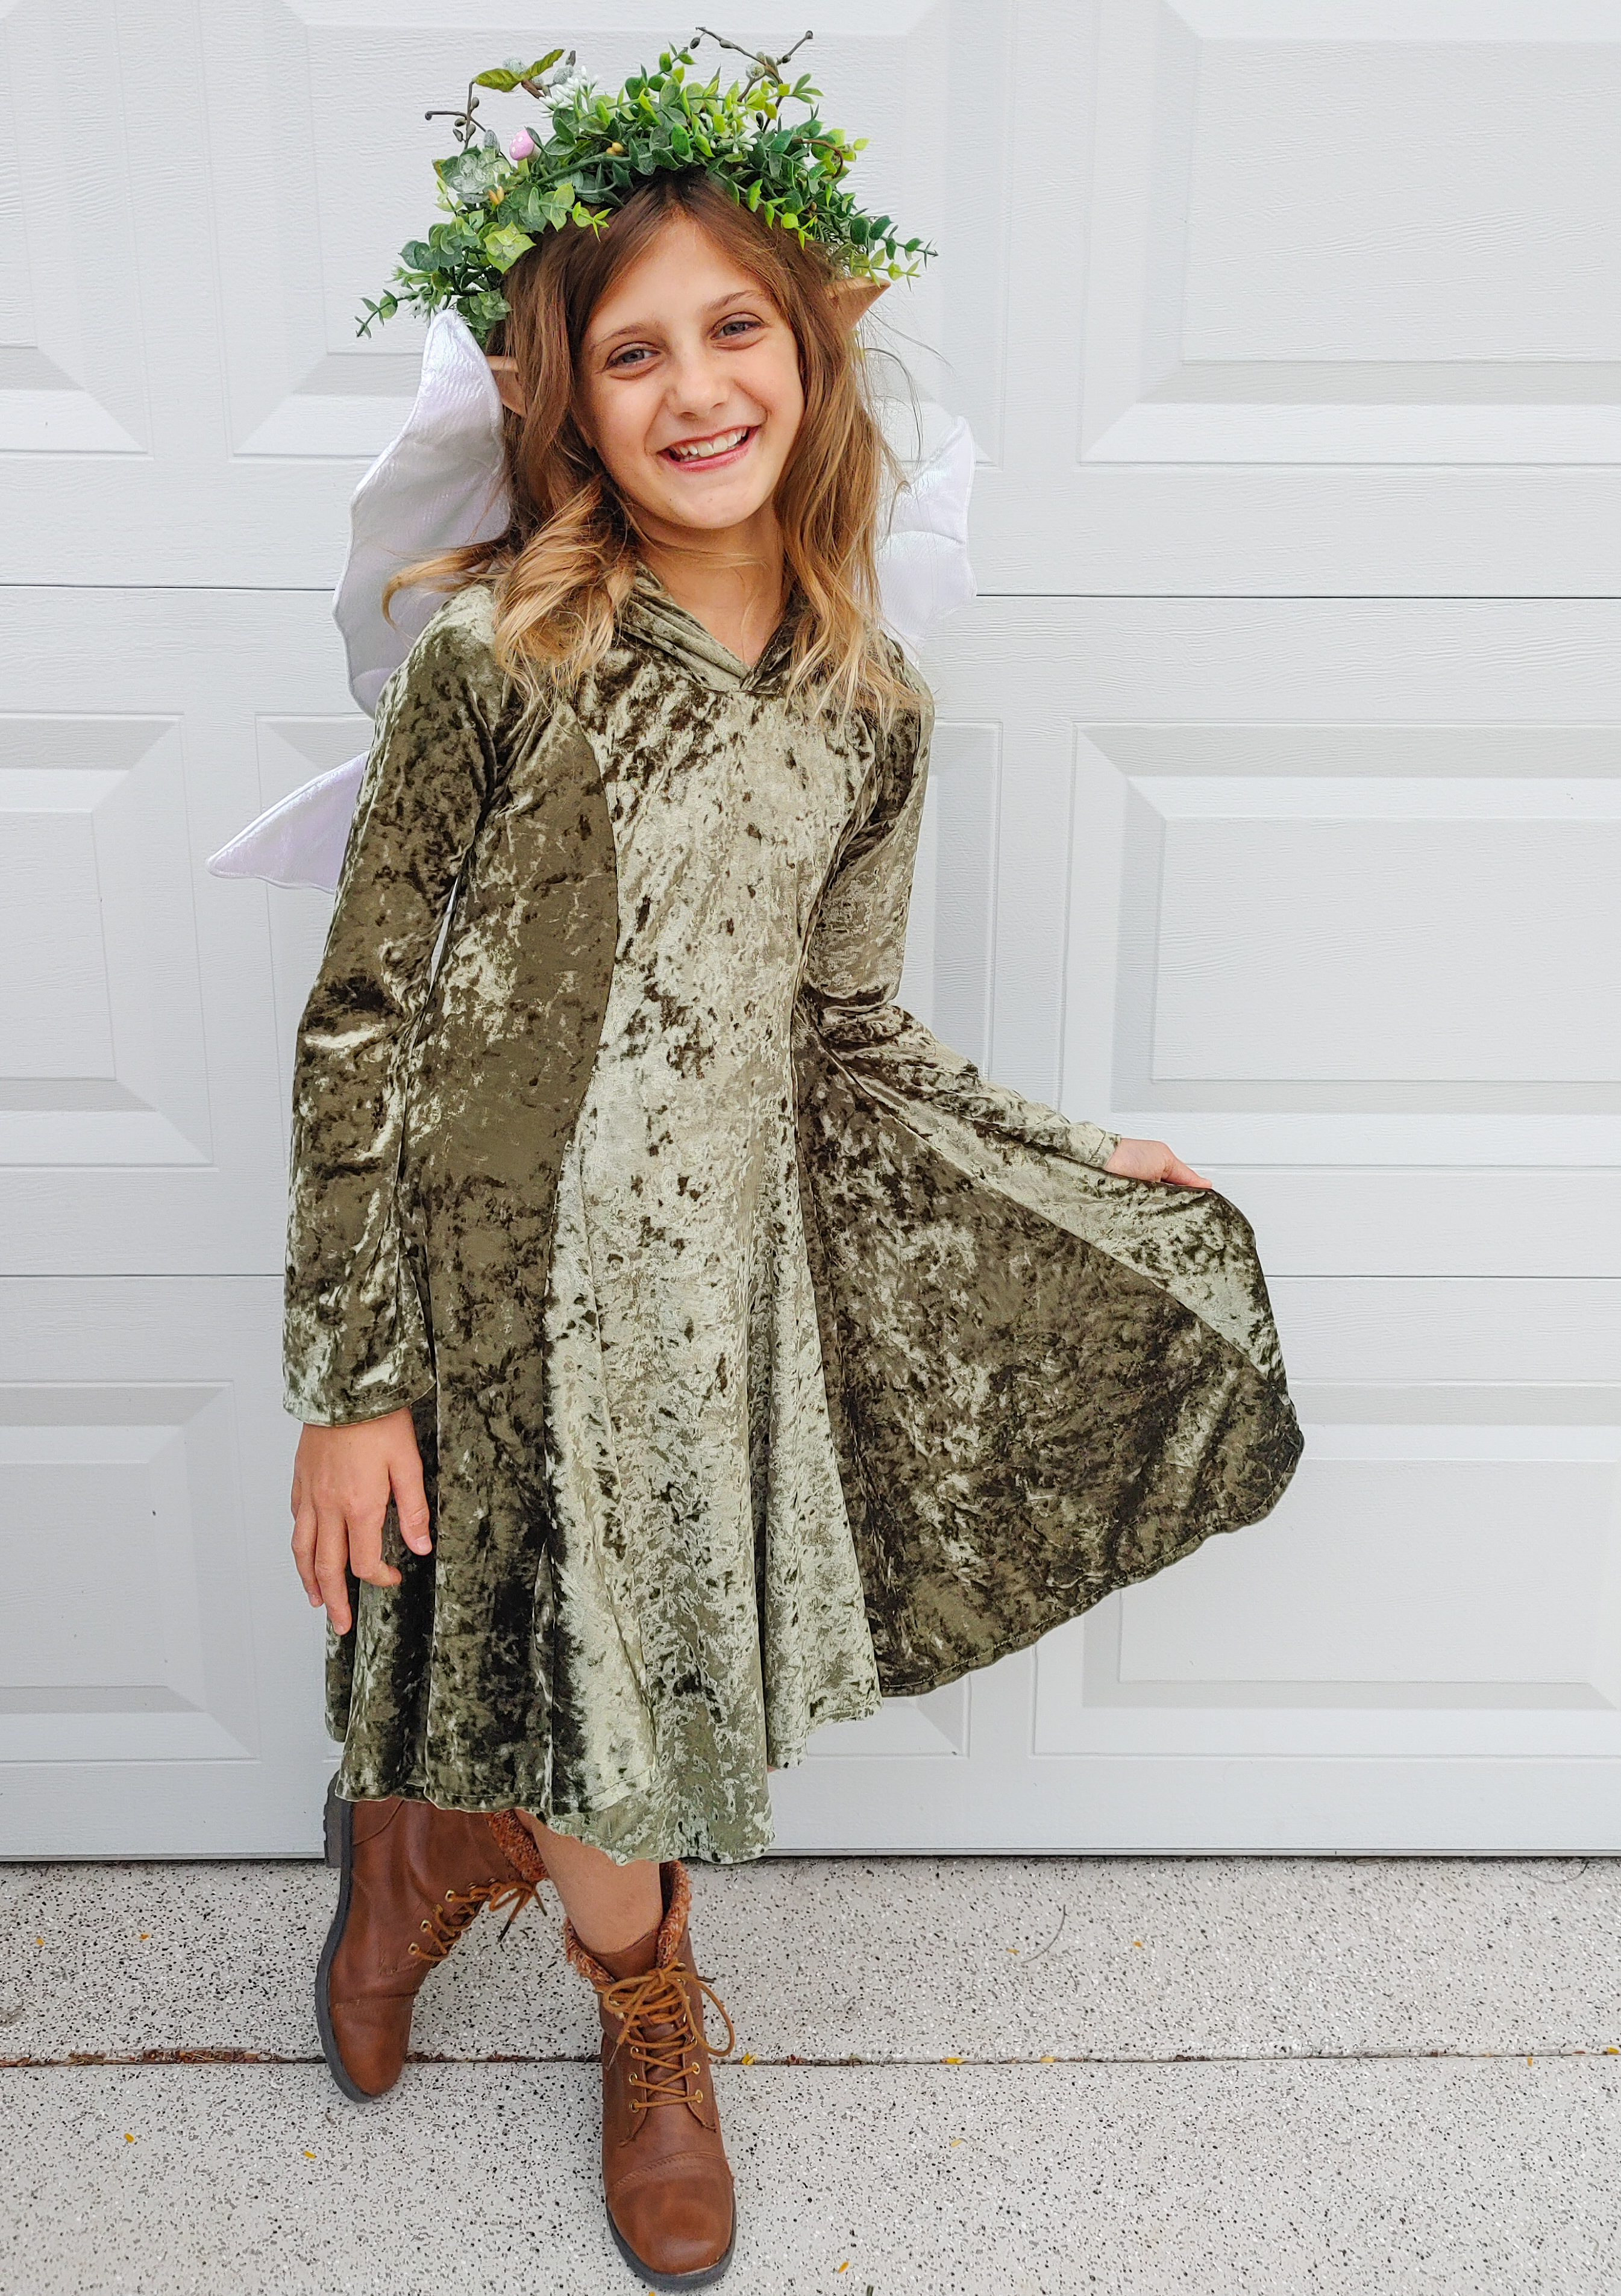
Next, my nine-year-old chose a pixie as her costume. I was able to test out the new Raven pattern from Boo & Lu Patterns several weeks ago and knew instantly it would be an amazing pixie dress in an earth toned crushed velvet. I found a dusty olive crushed velvet from Knitpop that paired beautifully with this pattern. I have been wanting an excuse to sew up some wings from Twig and Tale for years so I jumped on the opportunity to finally buy their Woodland Sprite Wings pattern. I used the medium sized wings and couldn’t believe how much easier they were to sew up than I expected! I did slightly modify these wings to add wire into the top portion of the wings only to help retain their shape better as I used a thinner fabric than the pattern recommended. While they are not difficult they are time intensive so be sure to allow yourself ample time to put these together carefully and properly. Her floral crown was so fun to make as well and I love my daughter’s idea to add mushrooms and butterflies (both found on Amazon) into the crown for even more woodland whimsy!
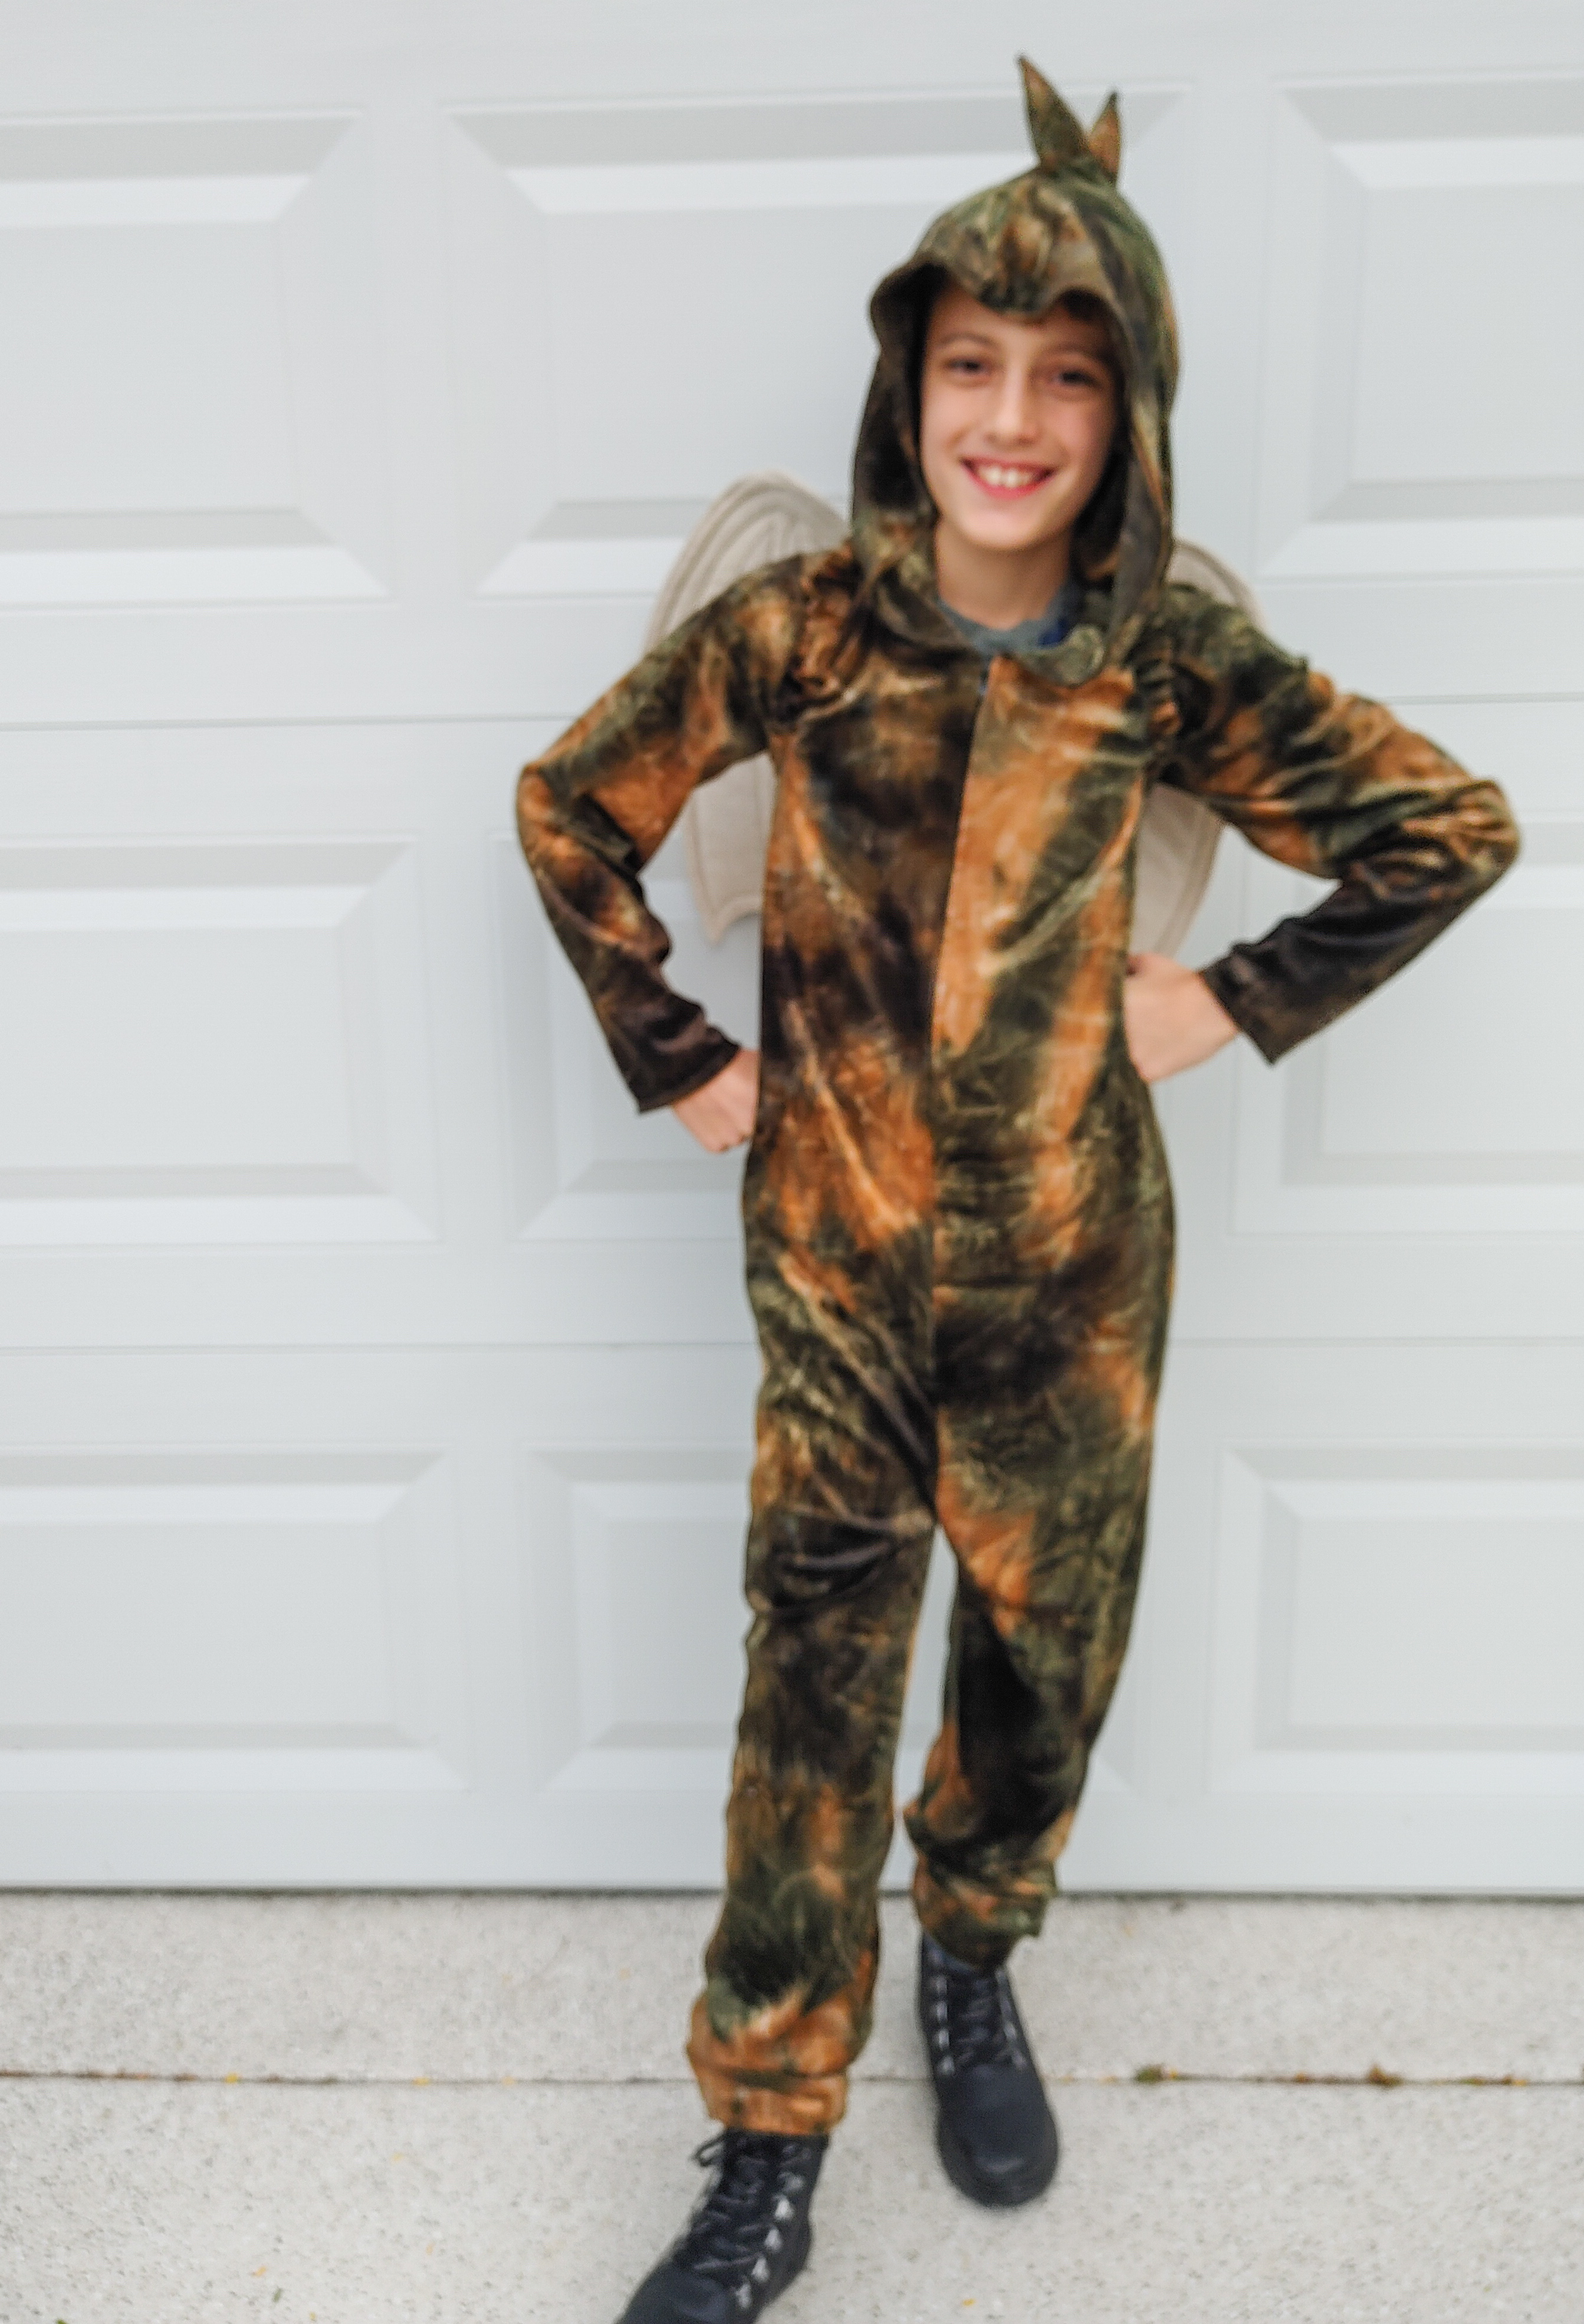
My son was excited about his choice of dragon and even convinced me to sew up a matching dragon costume for our pup! I found this really fun crocodile embossed camo-look fabric in the Halloween fabrics at my local Joann store and he loved it for his costume. For this look I decided to use the Ultimate Costume Creator from Peekaboo Pattern Shop. I was intimidated about the zipper installation but it was actually super easy and had great instructions for installment. I did find the pattern ran a little big even when using his measurements but he didn’t mind and will get to wear it for dress up for a longer time. He declined the back spikes as he wanted to wear dragon wings instead so I only attached spikes to the hood portion of the costume. For his wings I used the Twig and Tale Dragon Wings in the medium size and also ordered the Mini Size for our dog’s costume. These wings turned out incredible and just made his costume! When sewing the mini size for my dog I decided to pair them with a Pet Movie Night Shirt (a FREE pattern!) from Sew A Little Seam. For the back piece, I cut mirrored pieces (with seam allowance added) instead of on the fold so that I could attach the wings inside this back seam. They made the cutest combo and I love what a good sport with our silly shenanigans our little Yorkie is!
Finally, my oldest also wanted to dress up as a pixie this year but wanted a totally different look than her sister. She had a vision for an all white dress in a full circle skirt with full fluttery sleeves. I found the most gorgeous embossed jacquard knit on sale from Surge Fabrics that made the perfect twirly dress. For her costume I used the Sorrel pattern with FREE circle sleeve add-on modified to have a deep 2″ hem. I sewed up a second pair of Woodland Sprite Wings in the medium sized as well (she wanted her wings on the smaller size) and also added the same wire modification to hers. She watched me make her sister’s floral crown and wanted to make her own without my help. I have to say that it turned out so pretty and I am quite impressed with her skills! Her costume turned out SO elegant, graceful and magical.
I just love sewing up our family costumes every Halloween and can’t wait to see what next year has in store! I would love to have you follow me on Instagram for my sewing adventures as well!
*This post does include some affiliate links but all opinions and views are my own*
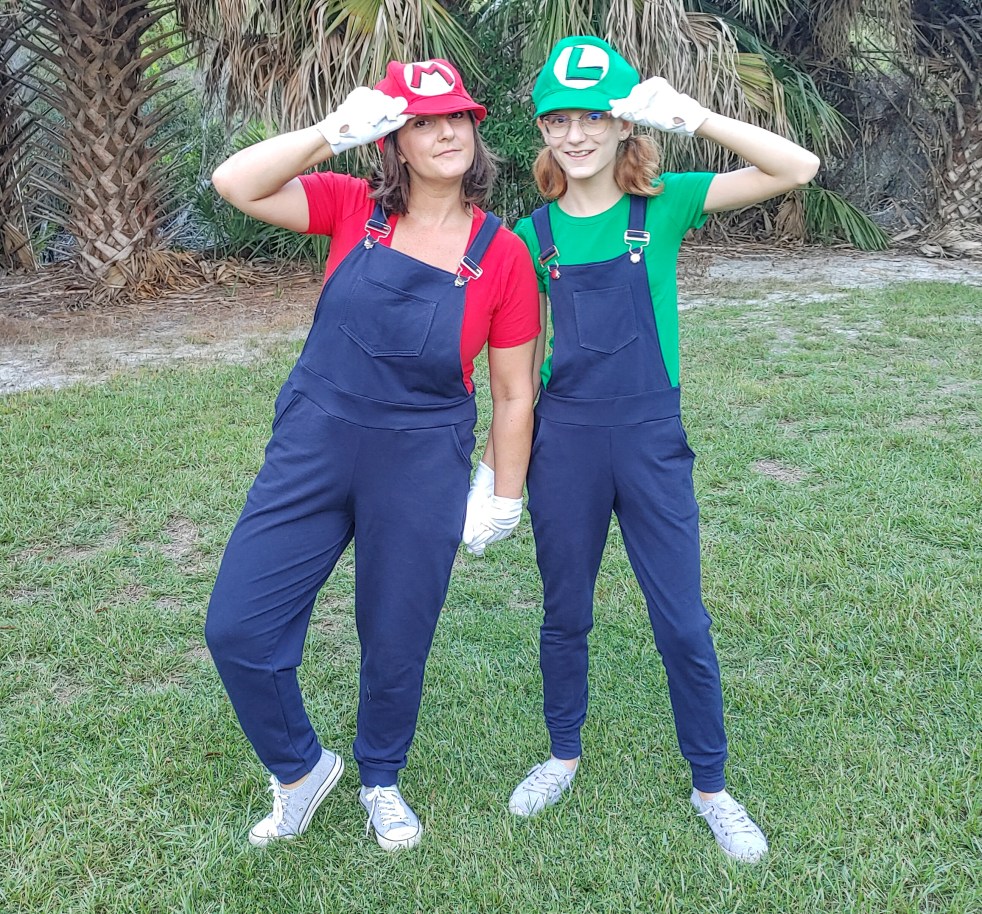
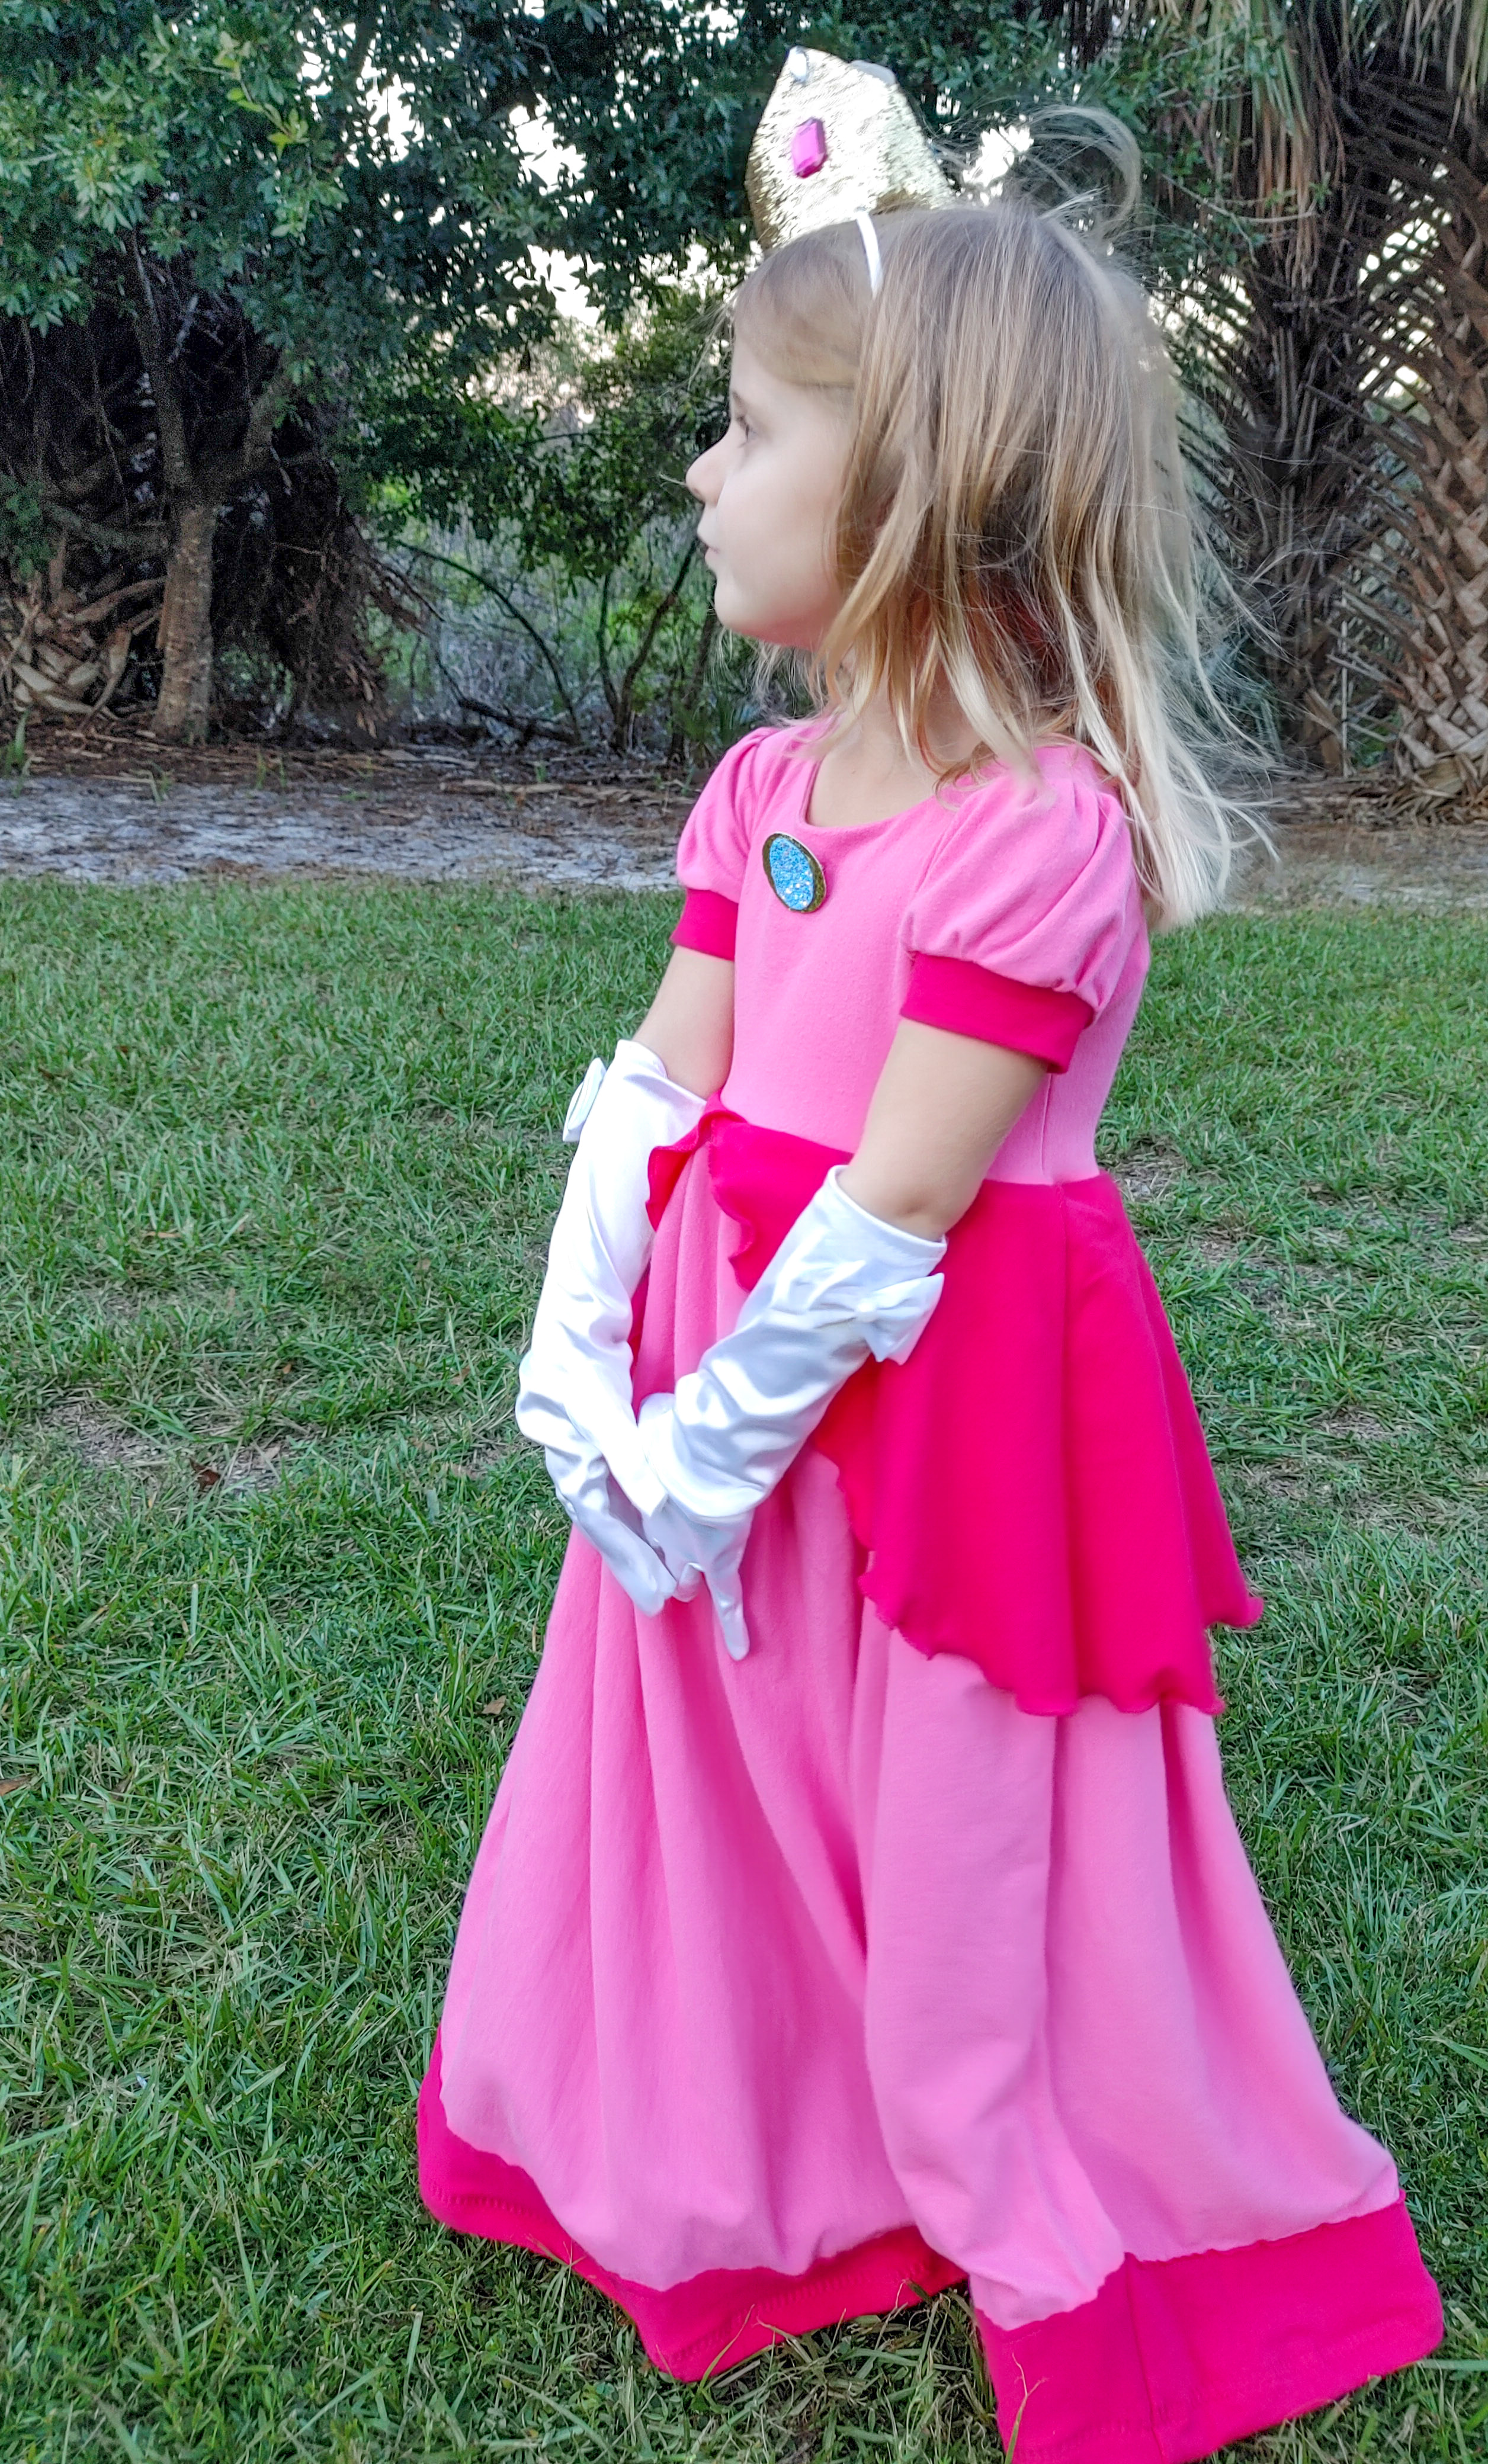
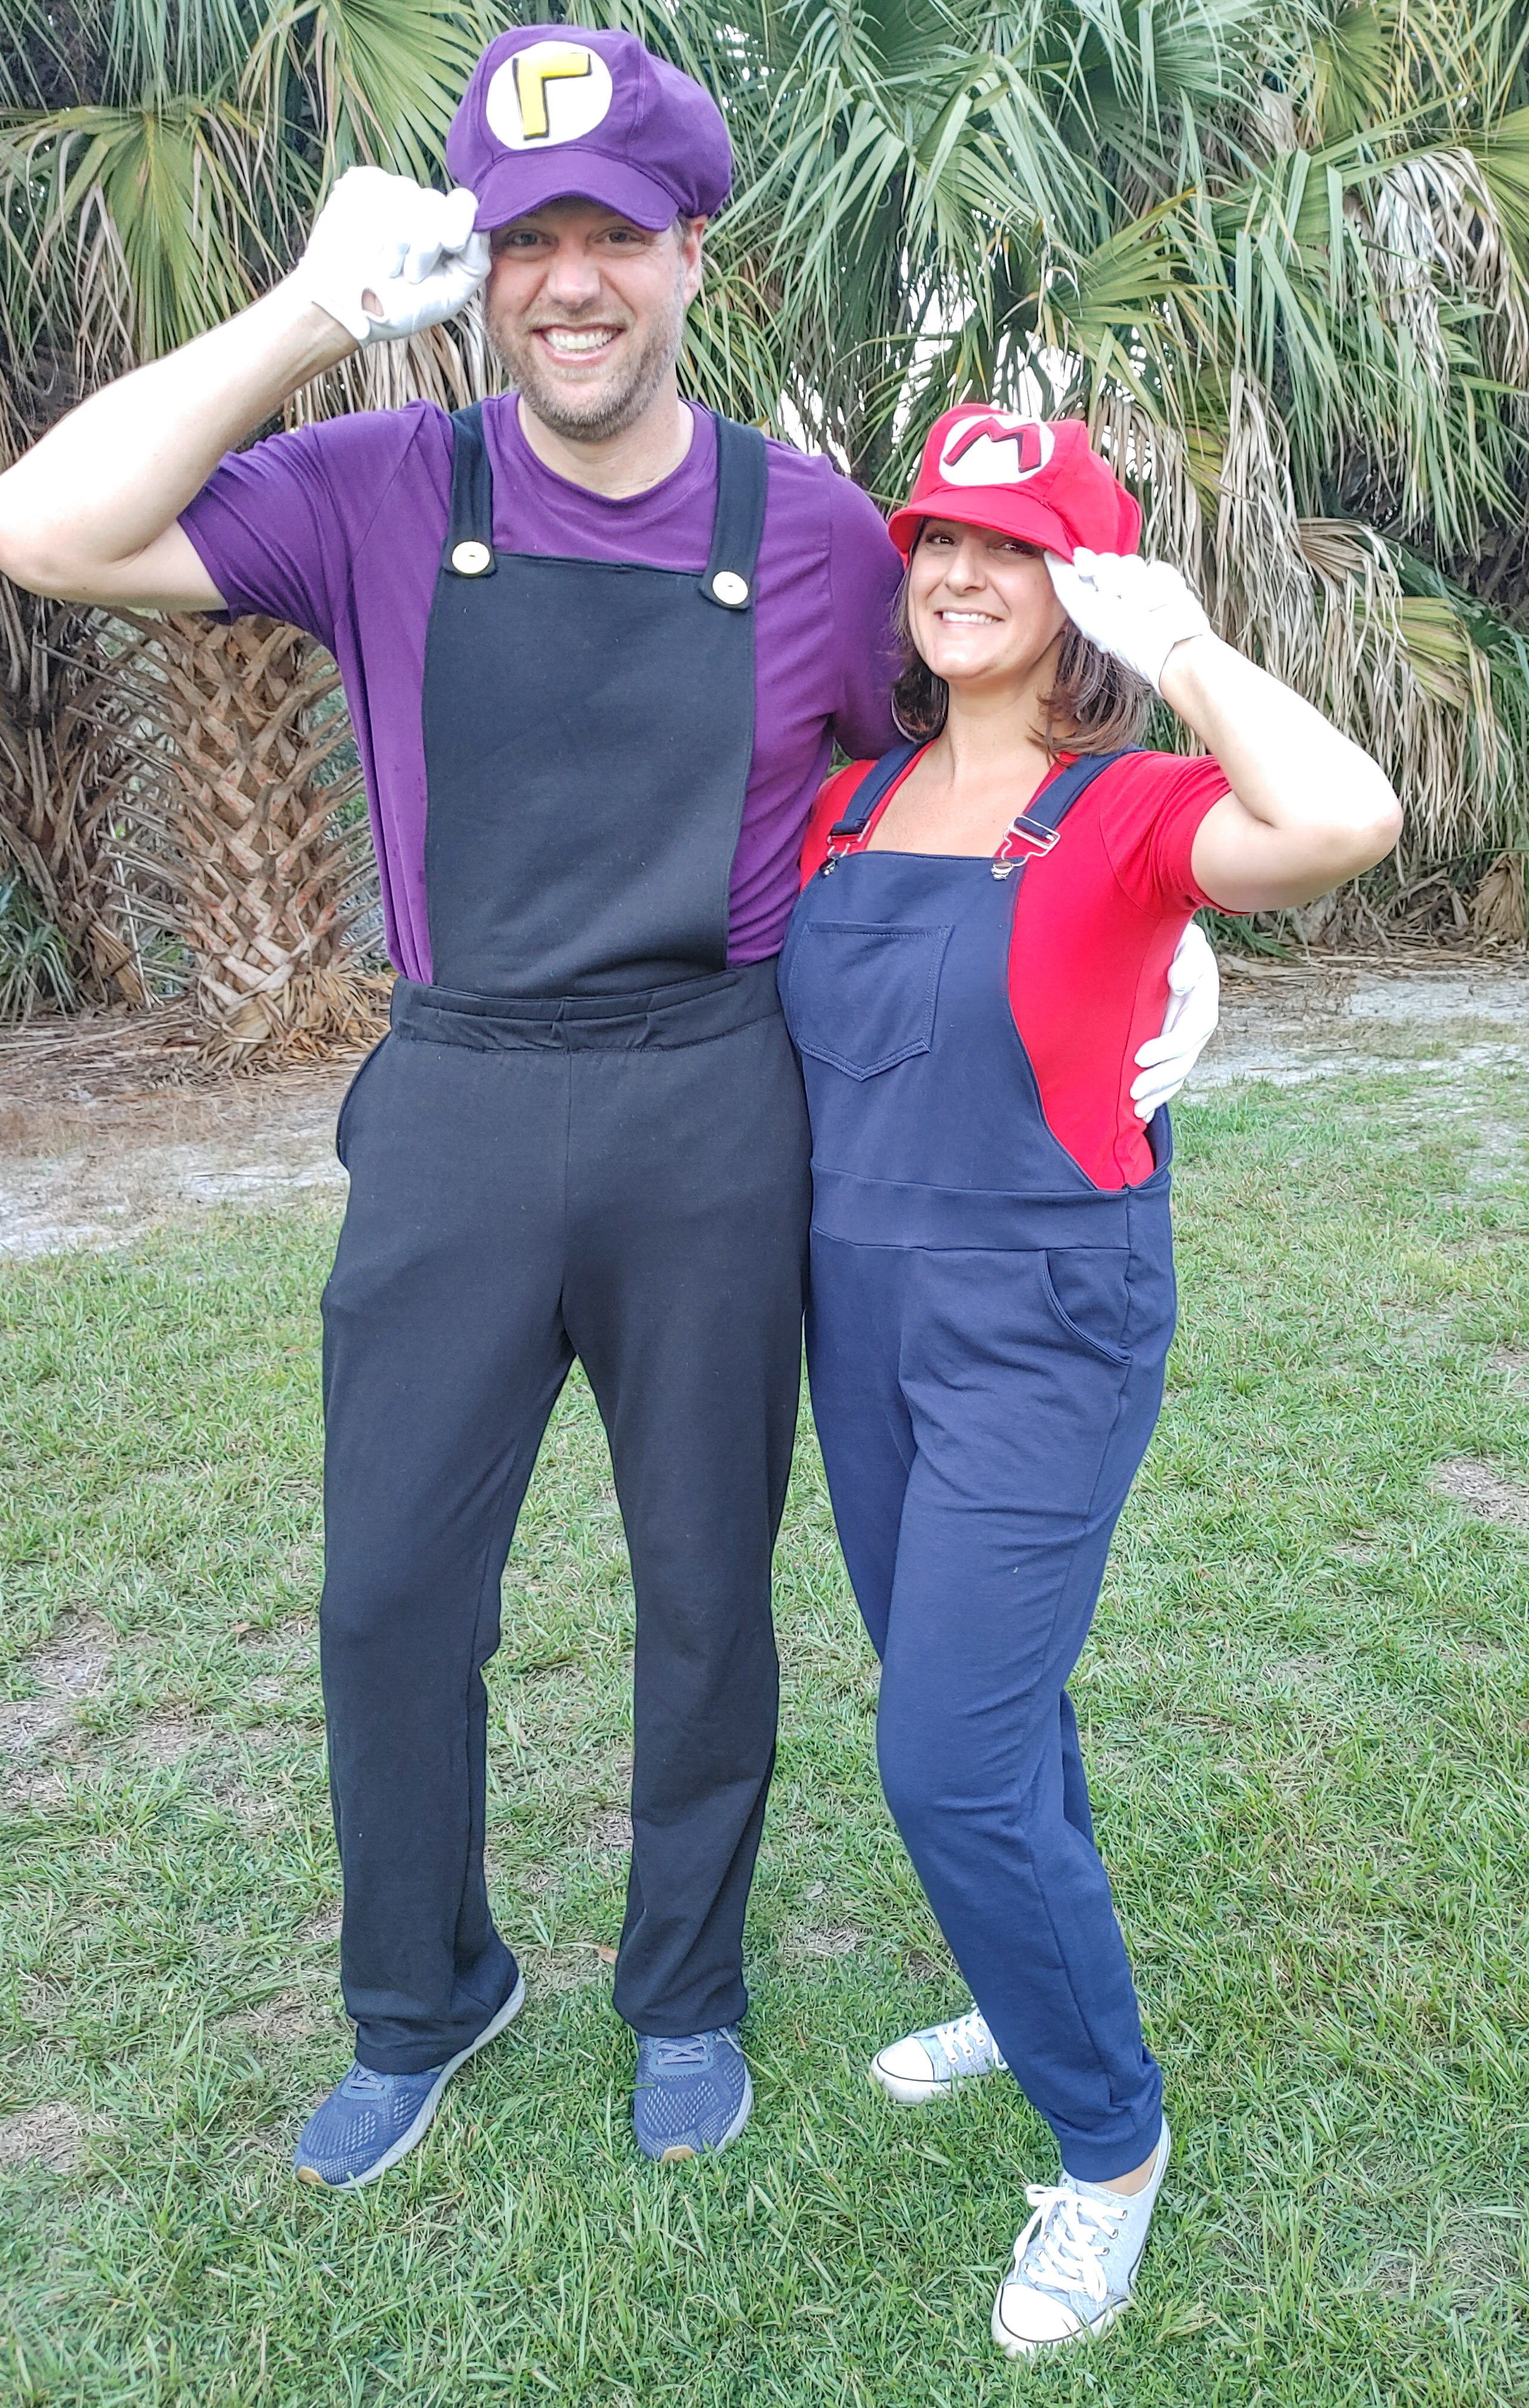
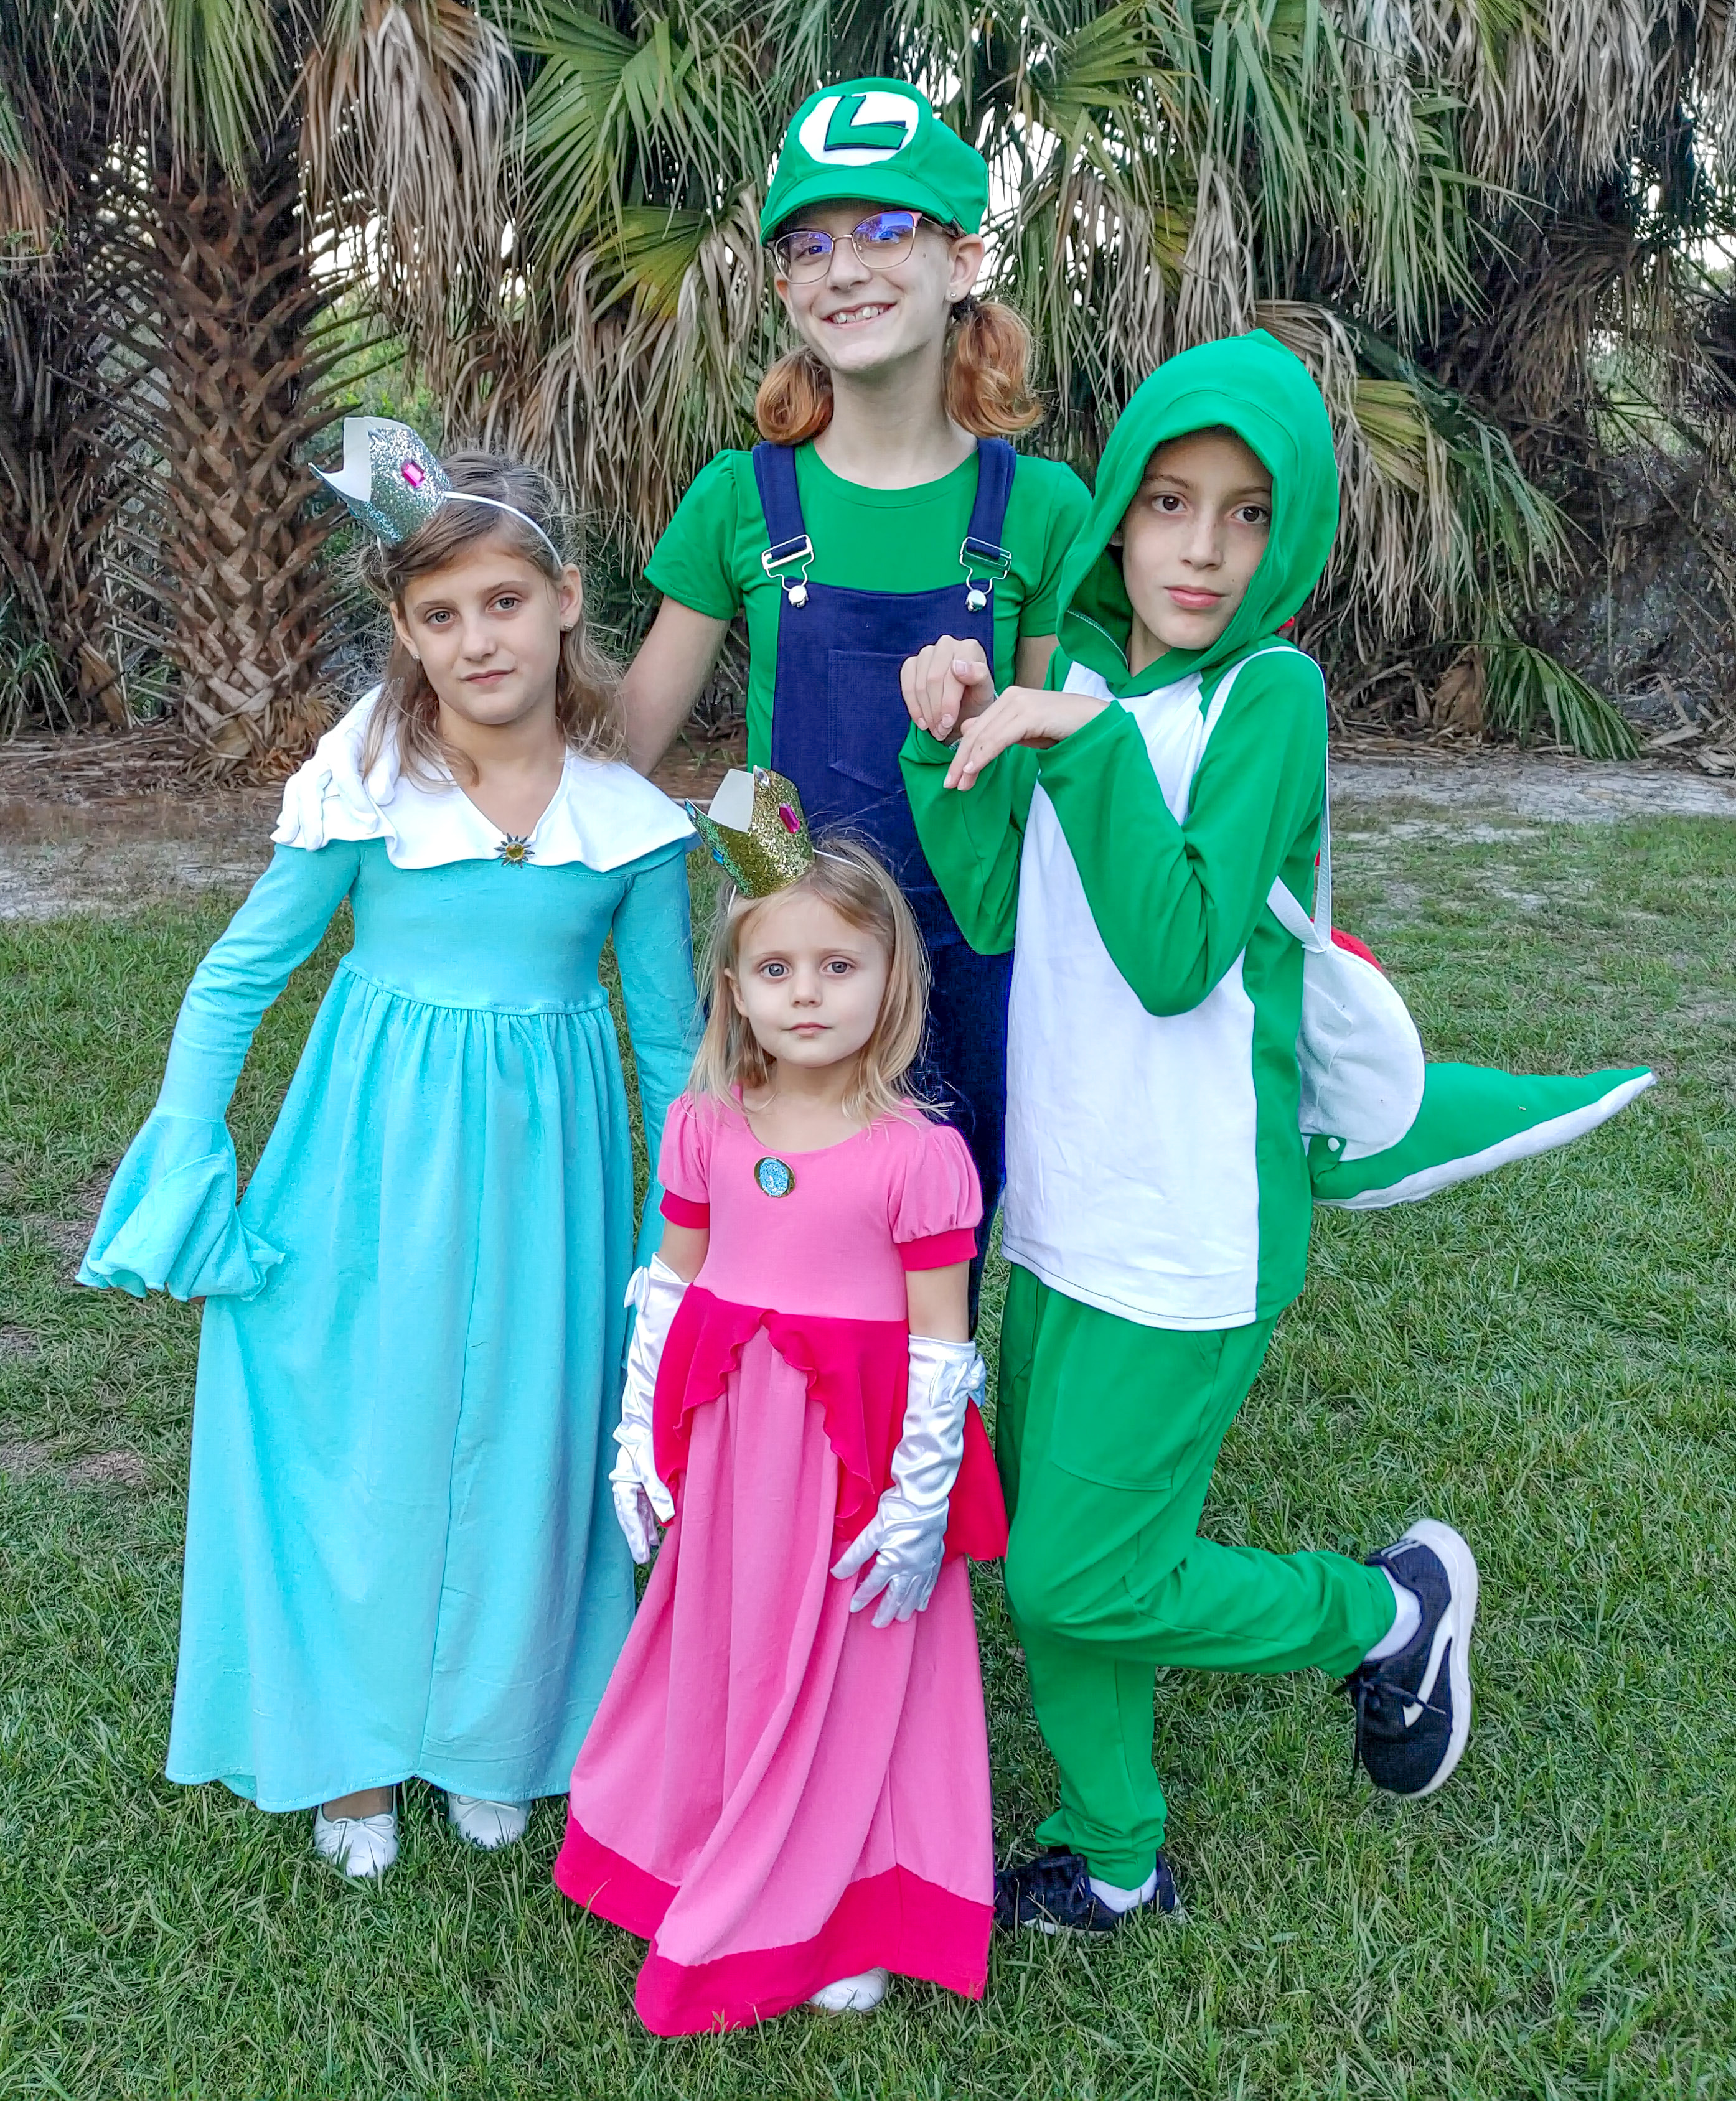
I am on the blog today to bring you handmade Halloween costume inspiration. My family does themed costumes every year and we chose characters from Mario Brothers this year after playing Mario Party together on repeat all year. I am so excited to share these makes with you all!
I used all Raspberry Creek Fabrics for our themed family costumes this year! I focused on using only solid fabrics in a mix of the Cotton Lycra and French Terry bases. I used Kelly Green, Mint, Bright Bubblegum Pink, Bright Fuchsia Pink, Eggplant Purple, White and Red in the Cotton Lycra base. These are all a 10 oz weight with 4 way stretch which is a really nice weight without being too warm or too light. I used Black and New Navy in the French Terry base. These are both a medium weight (11-12 oz) fabric with 4 way stretch.
These characters were SO FUN to create and I loved seeing all the pieces come to life. We chose Princess Peach, Rosalina, Yoshi, Luigi, Mario and Waluigi as our characters. First, my youngest is a princess obsessed little one and wanted Princess Peach (of course!) as her costume. I used the Bright Fuchsia Pink and Bright Bubblegum Pink for her costume. I used all pattern pieces from Simple Life Patterns and also blogged about this make here. So, head over to that SLPCO post to read all about how to create this princess themed look.
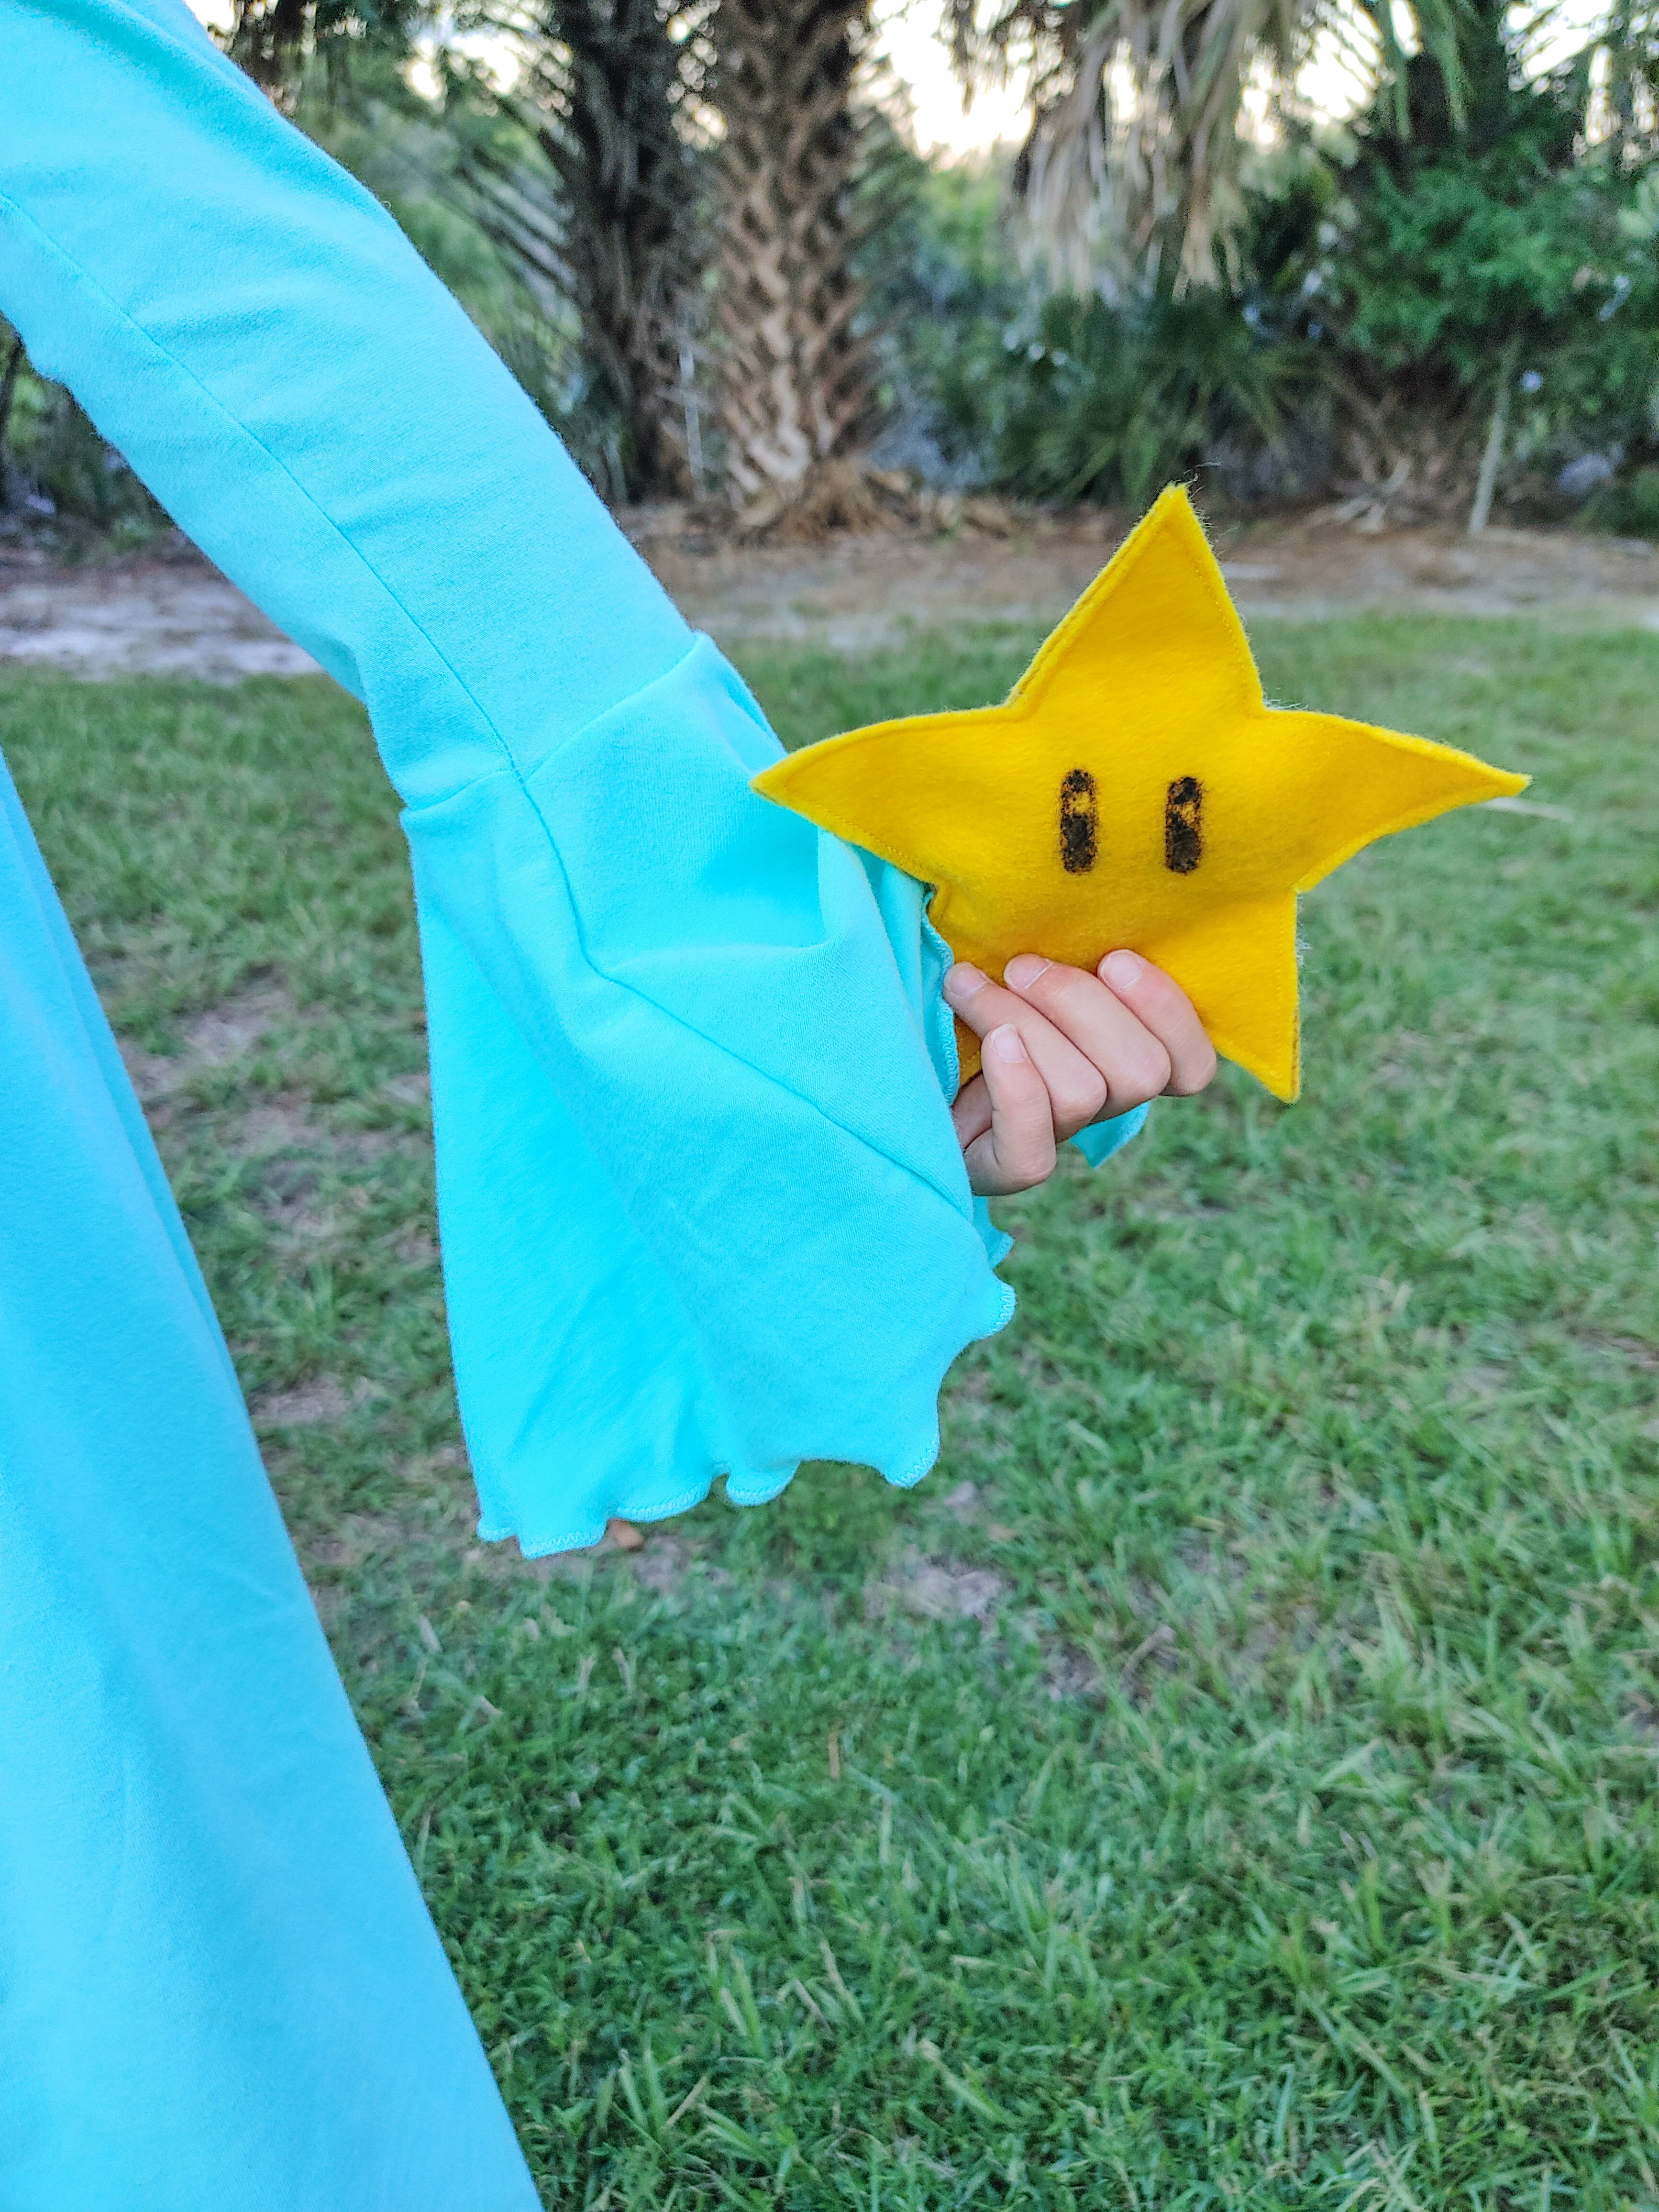
Next, my eight-year-old chose Rosalina as her favorite character. The mint was the perfect color match for her inspiration, and we paired it with the white for her shawl. This was such a fun costume to create as well, I mashed together a few patterns to create this look! First, I used the bodice from the Hibiscus Pattern from Petite Stitchery paired with the FREE bell sleeve add on. For the skirt, I used the maxi length Hampton from Simple Life Patterns. The front piece is cut mirrored (instead of on the fold) putting the “high low” side into the middle front seam and I added length to the back piece to give it more of a train look. For her shawl I used the over skirt pattern piece from the Diana pattern and modified it slightly to fit her shoulders and then pin closed. For both Rosalina and Peach’s crowns I used a crown template (Design ID 53108 in the Silhouette Store) cut on freezer paper with my Silhouette.
My son was the most challenging costume creatively as he selected Yoshi! This one took me the longest time to decide on patterns and how to create his saddle/tail combo for his back. I love the Kelly Green on his (paired with white and red) and love how versatile it is. He can wear the joggers after Halloween for pajama pants and can even wear the hoodie on cooler days as well since the saddle/tail combo are removeable. For his joggers I used the Baby Bear Joggers from Patterns for Pirates (with no alterations/modifications). For his top I used the MEGAMax Raglan from Max and Meena Patterns. I LOVE that this pattern includes alllllll the extra details (like the dino spikes featured here and all kinds of other creatures). For his saddle and tail I used the tail pieces from the MEGAMax Raglan but just hand drew ovals for the saddle and used fabric glue to attach the red to the white. Once the pieces were sewn and glued, I attached the tail to the saddle with snaps and added elastic straps. I wanted the tail to “stand up” like Yoshi so my husband had the genius idea to use a metal hanger bent to hold the tail up while the other half of the hanger is supported behind the saddle. Now the entire saddle/tail piece is easily removable with elastic straps!
My oldest loves the color green so Luigi was her first pick. For her costume I wanted to create pieces that were perfect for everyday wear as well because sadly she is too old for the dress up phase now. She is obsessed with overalls so this pair in French Terry will get weekly use for sure. I used the Zoey & Zeke Overall pattern from Made for Mermaids and paired them with an Arlo Top with crewneck option from Petite Stitchery. For her hat I used the Christopher Newsboy Cap from Create Kids Couture. Since this pattern is drafted for woven fabrics, I interfaced the knit outer pieces and used felt for the lining. I was nervous the hat would not fit well with using a knit fabric but they turned out perfect and hold their shape really well.
Finally, my husband and myself went with Mario and Waluigi for our costume choices! I love that both of my pieces are completely versatile for everyday wear just like my daughter’s and will get tons of use in my closet. I also used the Zoey & Zeke Overalls from Made for Mermaids but paired mine with a Favorite Tee from Patterns for Pirates. My husband can be *ahem* picky about his clothing and I was having a really hard time finding a knit pants pattern for him that wasn’t a jogger style. I finally found and decided on the Fit Pants from Mamma Can Do It. I am so happy I stumbled across this pattern as it is loaded with options for my hubby! I used the classic width and added length for his 6’3″ height. They turned out to be a perfect fit! Since I knew that he would not wear overalls on a regular basis I added a bib and strap to these pants after they were constructed. I simply measured how wide and tall I needed the bib to be while wearing the pants and attached them to the waistband. This way I can easily rip out the stitches after Halloween and he will have a super comfy pair of pants! I paired his overalls with the Straight Fit Basic Tee from Ellie and Mac. I used the same Newsboy Cap pattern for both of our hats and constructed them in the same method as the Luigi hat. We did have a mustache wardrobe malfunction so we just rolled with it anyway!
Finally, we couldn’t leave our sweet pup out of this costume fun! I used the same hat pattern linked above in the newborn size and used all felt for his hat. I added a little stuffing between the layers and straps to hold the hat on his head. He was not thrilled about his adorable Toad hat but we did manage to snap a cute pic anyway! Maybe he will even let us dress him up one more time for a family photo.
I loved being able to feature solid knit fabrics over on the Raspberry Creek Blog today and I hope you are inspired by these Halloween looks and can’t wait to see what you sew up! Don’t forget to share in the Facebook group as well😊
*This post was sponsored and does include some affiliate links but all opinions and views are my own*